VMware SDDC Technical Whiteboard

One of my favorite things to do is whiteboard. In my line of work, the whiteboard allows me to tell a story…one that can be broad in coverage, yet tuned on-the-fly to best align with the needs of the audience. It started as a “cloud” whiteboard back when vCloud Director (vCD) was released and the first vCloud Suite offering was announced. The first storylines were all about VMware’s cloud and management framework and leveraging vCD to align with a set of industry-accepted characteristics that defined “cloud”. There have been several iterations over time as new technologies (and acquisitions) came to fruition, with an evolving storyline to highlight modern challenges and the transformative nature of the Software-Defined Datacenter.

The whiteboard has been delivered on your standard everyday office whiteboard, table-tops, glass walls, flip charts, notepads, napkins, and electronically via powerpoint, iPad, and digital sketch pads. Regardless of delivery medium, I have found the whiteboard to be the most effective means of articulating the often-confusing details and associated benefits of the Software-Defined Datacenter at any level of depth…and without yawn-generating, ADD-invoking death by powerpoint.

My most recent iteration of the SDDC whiteboard doubles as field and partner enablement, so I had to put a little more thought into the storyline to ensure it closely resembles how customers have typically leveraged vSphere, NSX, VSAN, and the vRealize Suite evolve their existing datacenters to quickly build and gain the benefits of SDDC.…

vRA and NSX – Part 2, Staging Logical Networks

Introduction

A logical switch emulates a traditional network switch by creating logical networks that can be used to connected one or more vnics of a virtual machine to the corresponding logical network. In an NSX environment, logical switches are directly mapped to an available Transport Zone (VXLAN) and is stretched across all hosts and clustered configured with that VXLAN. Similarly, a Universal Logical Switch is deployed when used with Universal Transport Zones and can be stretched across hosts, clusters, and even vCenters. Logical switches are typically created and managed using the vSphere Web Client. Once created, machines can be logically wired to them for connectivity to other machines and/or upstream services (e.g. NSX Edge Services Gateway or Distributed Logical Router…or anything else wired to the resulting logical network). Thanks to the power of NSX, these networks can be spun up rapidly (albeit statically) and exist exclusively in the virtualization layer, saving countless management cycles and associated overhead (+ cost).

As you are well versed by now, NSX delivers the critical services needed for a modern network infrastructure while lifecycle automation of network and security services — from provisioning to decommissions (and everything in between) — are defined by the automation layer.…

vRA and NSX – Part 1, vSphere Prep

Introduction

There are a few prerequisite steps to complete on the vSphere and NSX side before vRA can be configured to consume its services or deliver on-demand networking and security. In Part 1 of this series, we will use the vSphere Web Client to review the NSX baseline deployment and add the necessary configurations for staging. What is configured here will depend on the desired objectives and use cases…I’ll cover minimum requirements.

Note: These steps assume you have already deployed NSX Manager, registered NSX with vSphere, and prepared hosts / clusters per best practice.

Objectives:

  • Review NSX deployment in vSphere to ensure prerequisites are in tact
  • Validate Logical Network / VXLAN configuration

As mentioned previously, this guide assumes a basic NSX deployment has been completed. This section will review the lab configuration and validate NSX has been properly deployed and configured.

1.  Log in the vSphere Web Client.

2.  Navigate to Networking & Security to review the existing NSX deployment configuration.

3.  Select Installation in the Networking & Security pane.

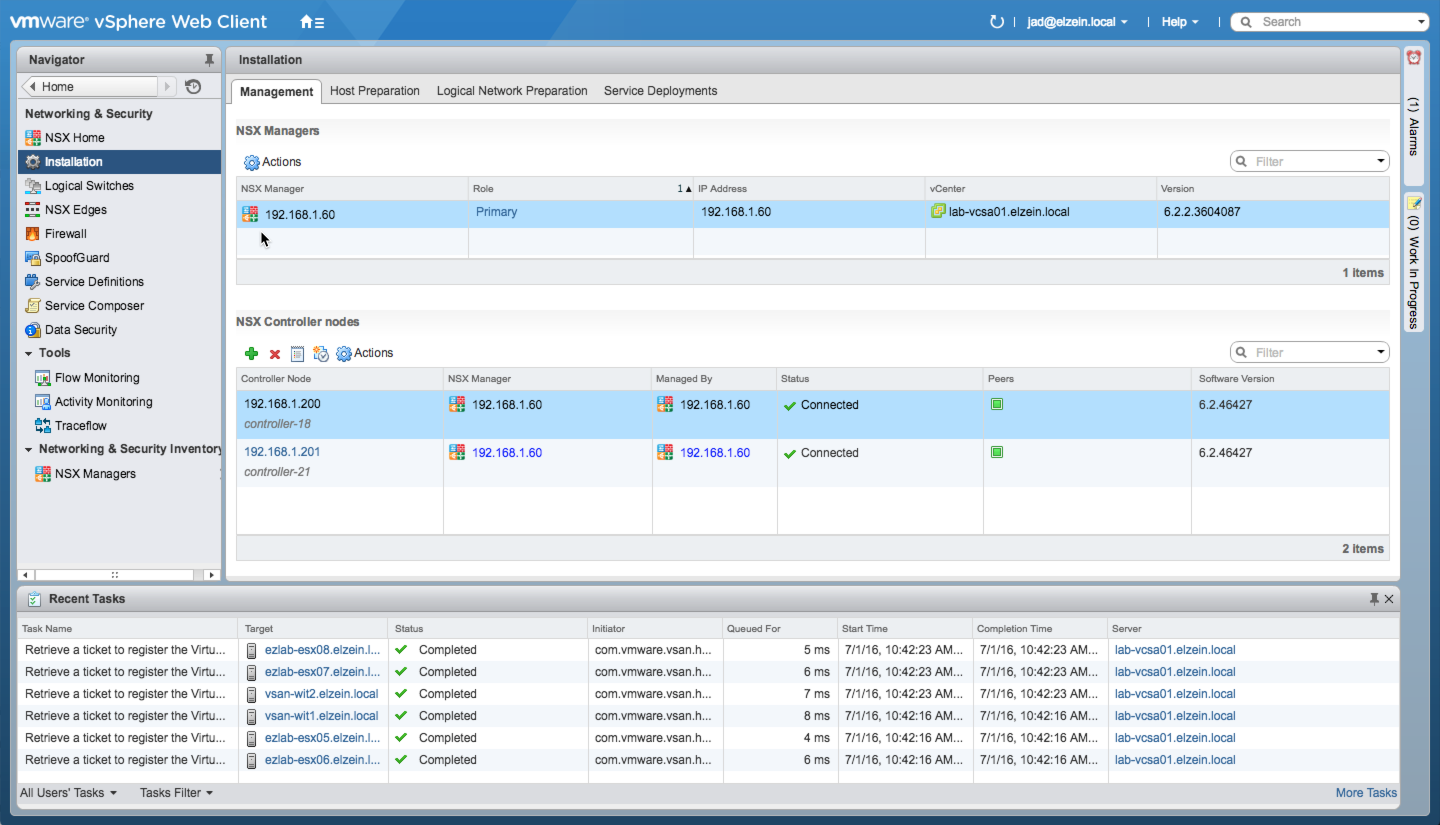
4.  In the Management tab, verify that at least one primary NSX Manager is available and at least one NSX Controller Node has been deployed (with status: Connected):

vra7-135

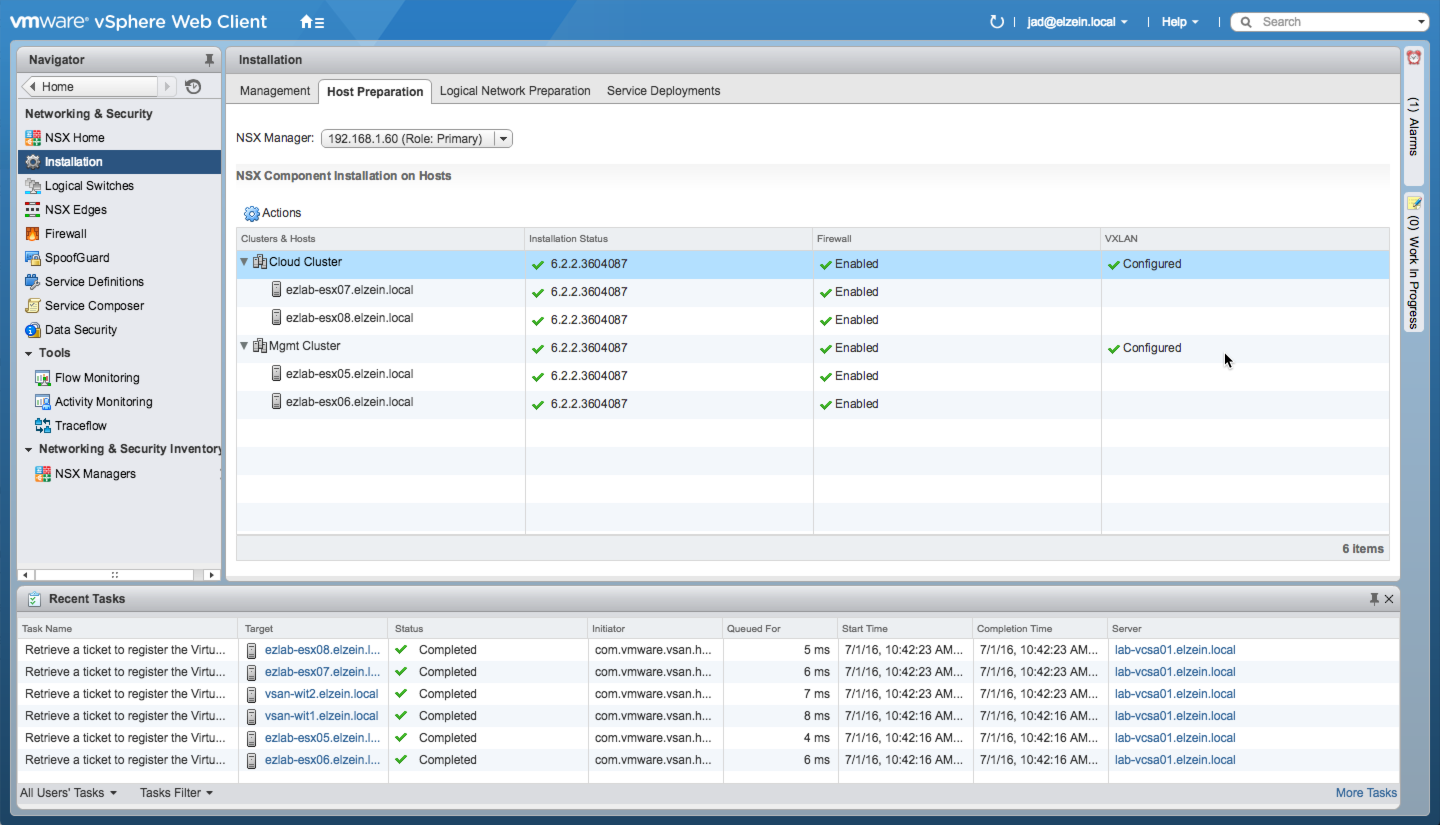
5.  In the Host Preparation tab, expand the target clusters and ensure Installation status, Firewall, and VXLAN are all showing a green check mark:

vra7-133

In this example, there are two configured clusters — Cloud Cluster and Mgmt Cluster.

Increasing vRA’s Concurrent Provisioning Operations

I get this question on a weekly basis (at least) – how many concurrent provisioning operations can vRA handle?
…and as soon as I say “2”, i get the [expected] follow up – how can I change that to something ridiculous?

Here’s how:

But first, let’s revisit the blanket statements above because they’re missing a lot of details. The REAL answer is “it depends”. Concurrency primarily depends on which Endpoint is configured, whether or not a proxy agent is used, and what the endpoint itself can handle. The vast majority of vRA customers have at least 1 vSphere Endpoint — which leverages a proxy agent — so I can confidently divulge the default concurrency of 2. Here’s a glimpse of those defaults…

  • Proxy Agent-based (vSphere, XEN, Hyper-V) – 2 per agent
  • DEM-based (all other supported endpoints) – no fixed limit (sort of, see below)

There are a few additional considerations:

  • The number of concurrent workflows per DEM instance. That number is 15 (per DEM).
  • While DEM-based endpoints have no theoretical limit, the DEM workflow concurrency of 15 (per DEM) does apply.
  • Endpoint limits are at play (that is, the endpoints themselves). For example, vSphere 6 can handle 8 concurrent operations by default.

ProTip – Scheduling Tasks in vSphere Web Client

There are many hidden gems in the vSphere Web Client that are intended to make managing the environment much more efficient. This is one of my favorites. You can quickly schedule any of the supported tasks for a one-time shot or repeating.

On a Windows machine, hold the CTRL button *after* right-clicking on a VM object. Continue to hold the button until you select the [supported] task to schedule.  On an OSX machine, i noticed the schedule icon will appear while pressing CTRL but only function with COMMAND instead (bug will be filed).

+++++
@virtualjad…

VMware vCAC IaaS Optimization Guide

Update 04/22/15: After further investigation around the effectiveness of these optimization tips on a vRA 6.2.1 environment, I am convinced that several of the tweaks do in fact provide some level of perceived IaaS UI performance improvements. I’m very interested in hearing your feedback on these findings (i.e. give it a try and let me know!).


Update 12/10/14: I have been advised that the optimization tweaks highlighted in this article will not provide any added benefits to vCAC/vRA 6.1 or 6.2. This is due to the way the IaaS interface is now presented back to the user (via the vCAC appliance vs. directly to the user session). The good news is VMware dev’s are hard at work at baking optimization right into the products, starting with a significant boost in the recently released vRA 6.2.

VMware’s vCloud Automation Center (vCAC) can transform how an enterprise delivers IT. It’s out-of-the-box functionality will help IT deliver Infrastructure-as-a-Service (IaaS) along with X-as-a-Service (XaaS / Everything-a-a-S) in a matter of clicks. Once extended into the datacenter’s ecosystem with vCAC’s extensibility engine, it will help integrate, orchestrate, and automate native and 3rd-party tools, services, and infrastructure, thrusting the enterprise into a new level of self-serviced IT efficiency.…

Using VSAN Storage Policies in vCloud Automation Center

VMware vCloud Automation Center is the center piece of VMware’s Software-Defined Enterprise vision. It is also the primary user and admin interface for enterprise and application services, and therefore it makes a lot of sense for vCAC to be the core integration point for the SDDC.

Rawlinson Rivera (@PunchingClouds) recently posted a blog post titled “VMware Virtual SAN Interoperability: vCloud Automation Center“, where he highlights the use of vCloud Automation Center (vCAC) 6.0 to deploy applications directly to a VSAN Datastore while also leveraging a VM Storage Policy. In short, the desired storage policy is applied to the template backing the vCAC Blueprint. Once provisioned, the resulting machine adopts the associated storage policy and the rest is glorious, app-centric VSAN storage consumption. I recommend reviewing that post to get a better idea of what we’re doing here.

So now that we have a basic understanding of the interoperability between vCAC and VSAN, let’s dive into some more advanced concepts for a glimpse into the art of the possible by expanding on Rawlinson’s example and using some of vCAC’s extensibility features to deliver greater functionality.The integration between vCAC and VSAN can greatly enhance how applications are provisioned.  Since storage policies can be configured per-application or VM, you can specify varying policies based on the use case, tier, application criticality, SLA, etc…all backed by a common VSAN Datastore.…

Scaling VSAN: Adding a New VSAN Host

In my previous post, VMware VSAN Meets EZLAB, I highlighted the implementation of VSAN into my vCloud lab. At the time of writing, 1 of 4 my vSphere hosts was down for maintenance and was not added to the VSAN cluster. Now that it’s back online, I thought I would share the experience of adding a new VSAN host…and another 2.25TB of capacity.

Here’s a “before” shot — 3 hosts configured with 6.13TB total capacity…

Step 1: Add the host to the existing VSAN cluster: I’m pretty sure I don’t have to review how this is done. Once added, configure all settings to match the other hosts in the cluster…in my setup I’m using a dedicated pNIC and vmkernel port (vmk1) for all storage traffic.

Adding new host to the vSphere cluster

The local storage of the new host, a Dell R610 box, is configured identically to the other
three — 1 x 256GB SSD + 3 x 750GB SATA drives. And since it is
identical, that also means I had to deal with the fact that the PERC 6/i
controller does not support JBOD. So, I stepped through the work-around to identify the SSD as such…

before…the SSD show up as “Non-SSD”


“esxcli storage…” command executed on host


the SSD is now recognized as an SSD drive


Step 2: Enable VSAN Service on the vmk port…

Configure vmk for VSAN traffic

Step 3: Disk Management…

Since my VSAN cluster is configured to “Manual” mode, adding the new host’s disks to the cluster takes an additional step.…