The IaaS Fabric is made up of all the infrastructure components that are configured to provide aggregate resources to provisioned machines and applications. This is represented by several logical constructs that are configured to identify and collect private and public cloud resources (Endpoints), aggregate those resources into manageable segments (Fabric Groups), and sub-allocate hybrid resources (Reservations) to the consumers (Business Groups).
In this chapter, we’ll walk through the end-to-end details of building out the IaaS Fabric — on vSphere — to support machine provisioning.
Configuration Checklist
- Configure Roles and Permissions
- Add (vSphere) IaaS Endpoint
- Add vRO IaaS Endpoint
- Create a Fabric Group
- Create a Custom Group
- Create Machine Prefixes
- Create (2x) Business Groups
- Create External Network Profiles
- Create (2x) resource Reservations
Video
Detailed Steps
| Configuration Details | Screenshot |
|---|---|
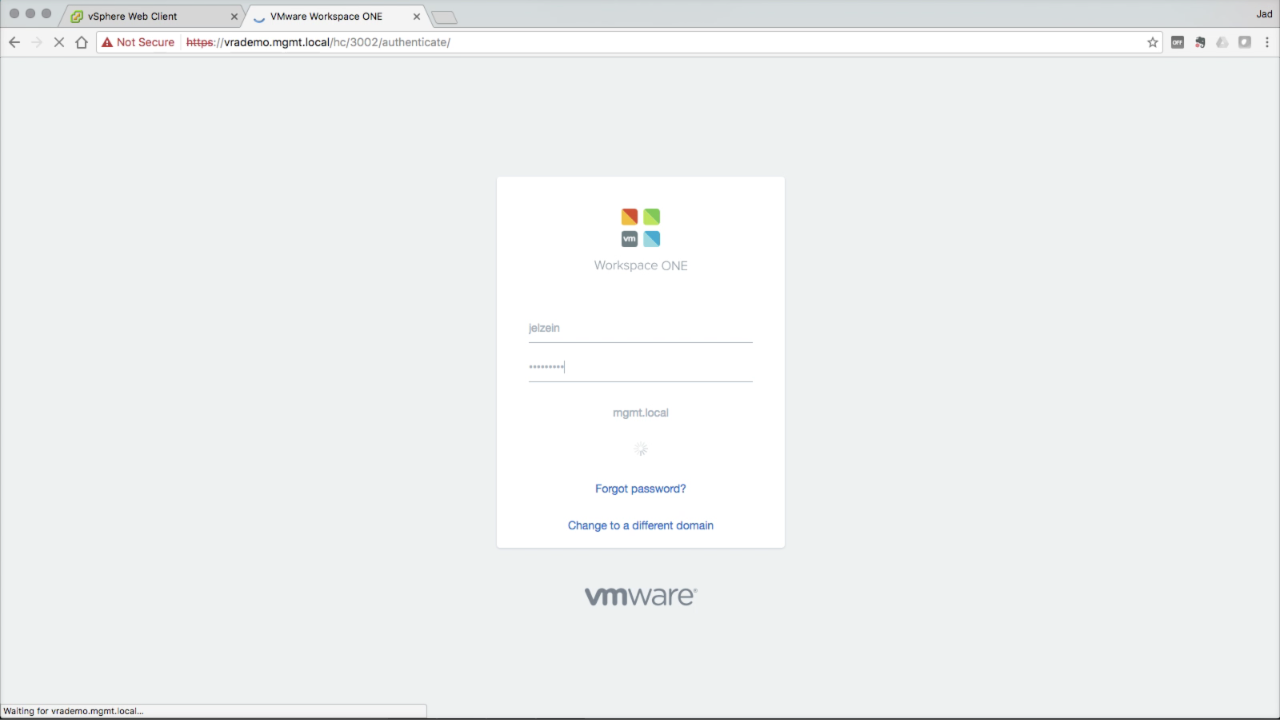
| Before starting, we will add additional roles to domain users and groups that have been synced with vIDM.
Log in to vRA using an account with Tenant and Infrastructure admin roles… |
|
| Add Roles to a Group
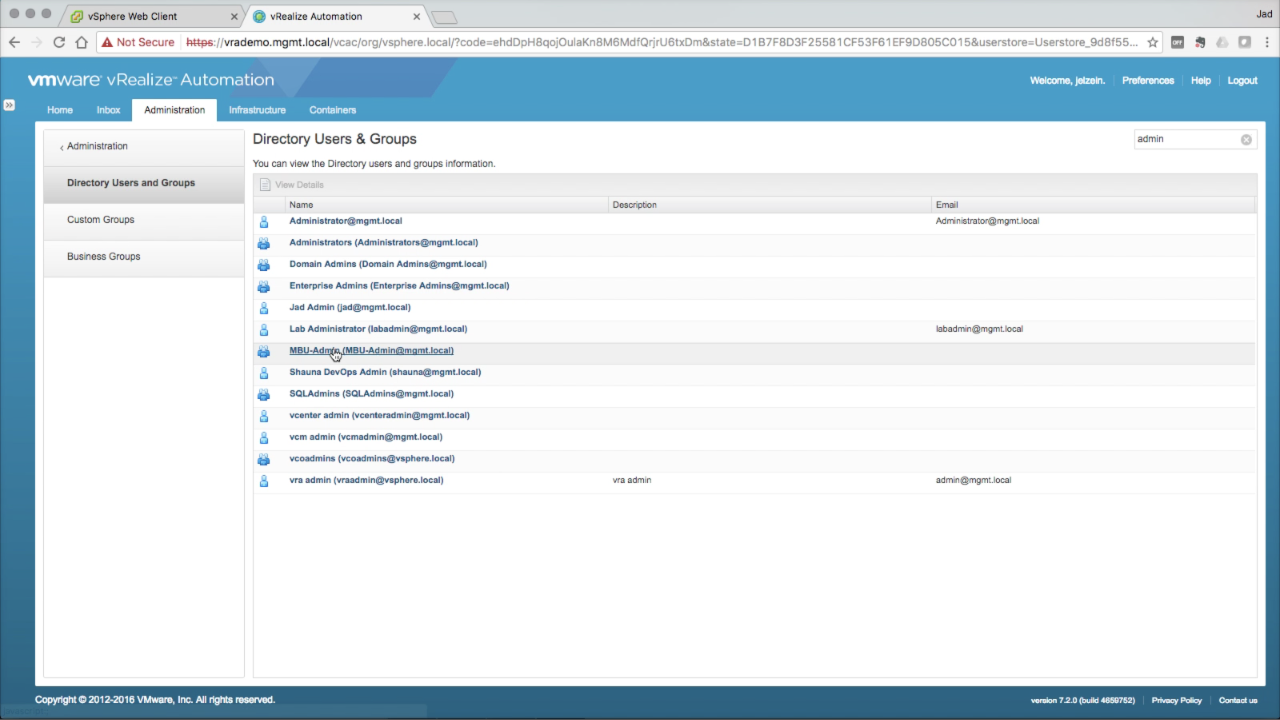
Navigate to Groups → Directory Users and Groups under the Administration tab. Using the search field (top-right), enter a portion of the target user or group (e.g. “admin”), hitting Enter to submit. This search returns all objects in vIDM (sourced locally and from the configured directory). Click on an object to edit it (in this case, I’m going to modify the AD group “MBU-Admins”)… |
|
| Add Roles to a Group
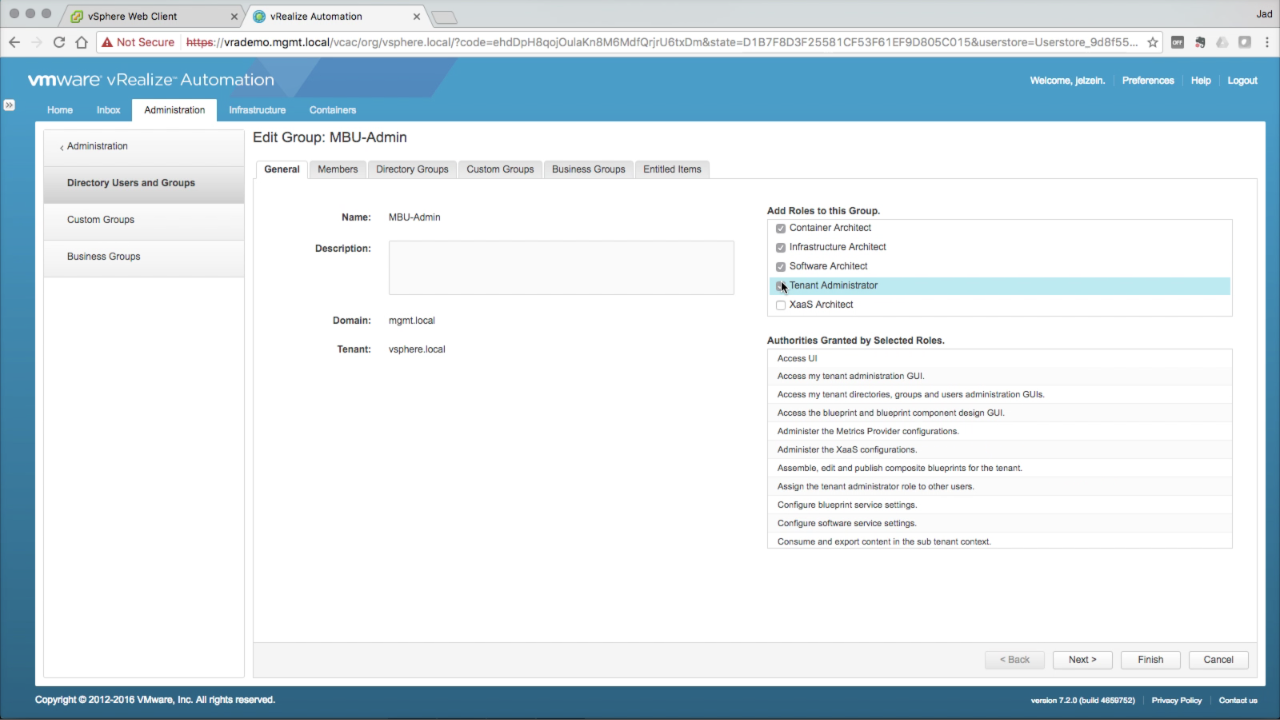
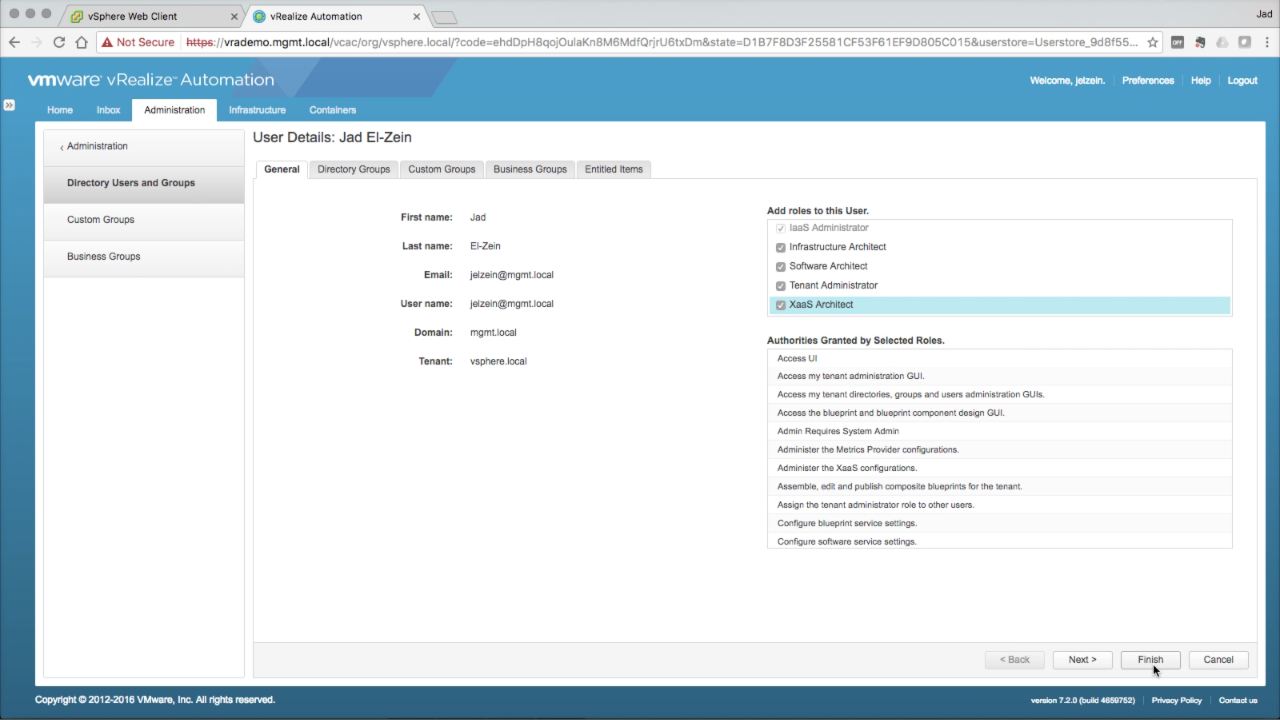
Navigate to Add Roles to this Group section in the General tab Select the desired roles for this group. For the sake of this guide, i will assign superadmin rights to this group (i.e. all admin roles). You should be more decisive in practice. Click Finish to accept the changes. |
|
| Add Roles to a User
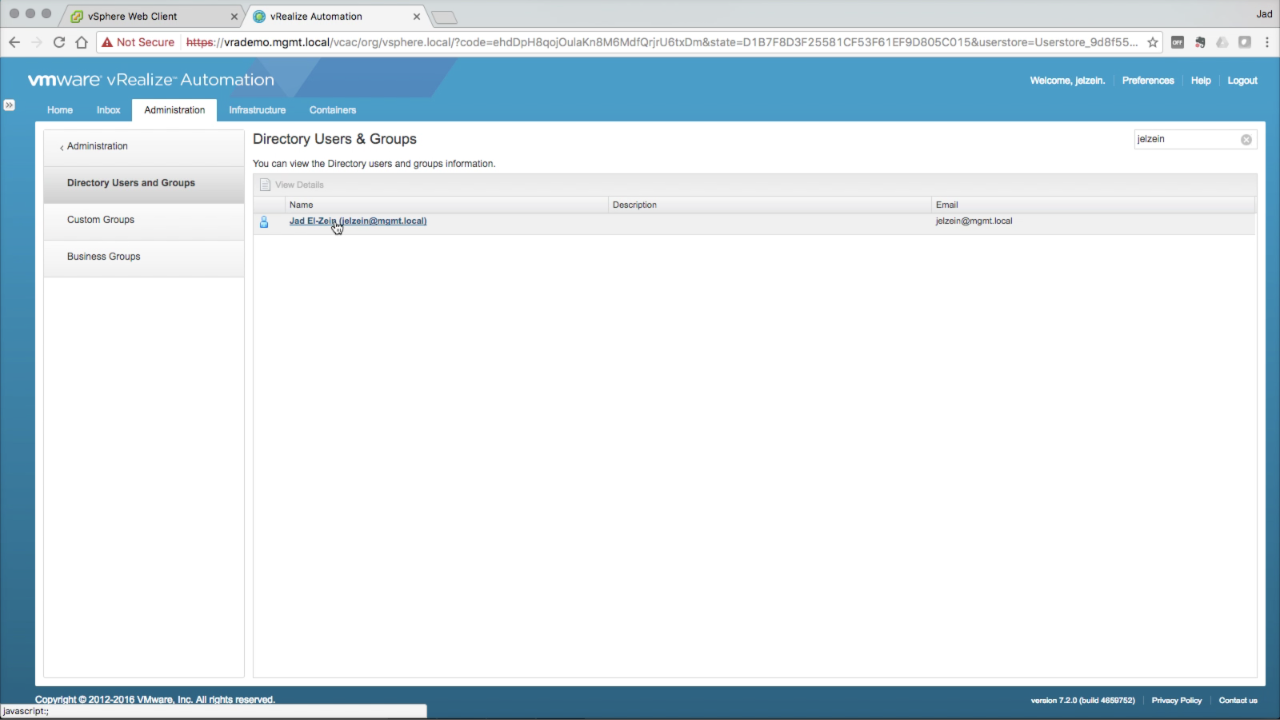
Next we’ll be adding the same superuser roles to an individual user. Use the search box to enter a portion of the target user, hitting Enter to submit (e.g. “jelzein”). Click on the returned object to edit it’s permissions… |
|
|
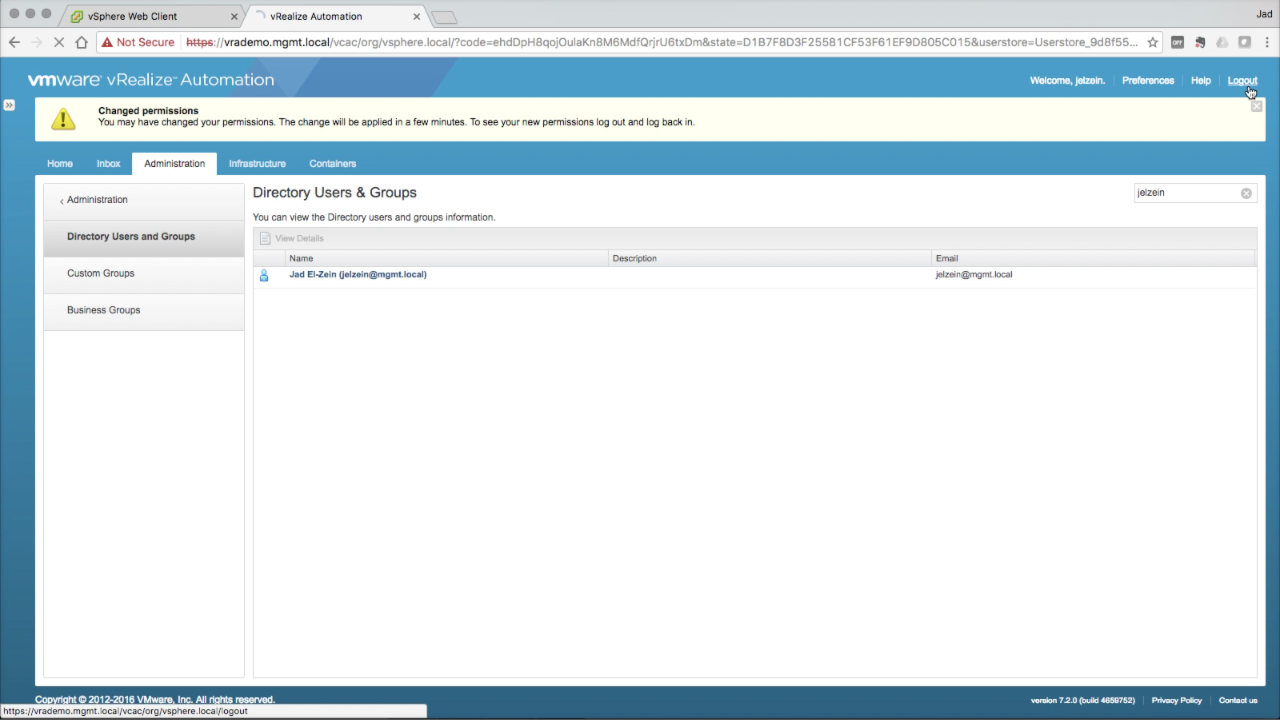
Add Roles to a User Select the desired roles for the target user. Again, adding all roles for superadmin permissions in this example. Click Finish to accept… If the logged in user’s permissions were changed, vRA requires resetting the user session to apply the changes (e.g. log out/in).
NOTE: This user happens to belong to the MBU-Admin group configured previously and will inherit the permissions from that parent object. So, technically, user-level permissions aren’t needed in this example. But that will not always be the case. |
|
| Configure a vSphere Endpoint
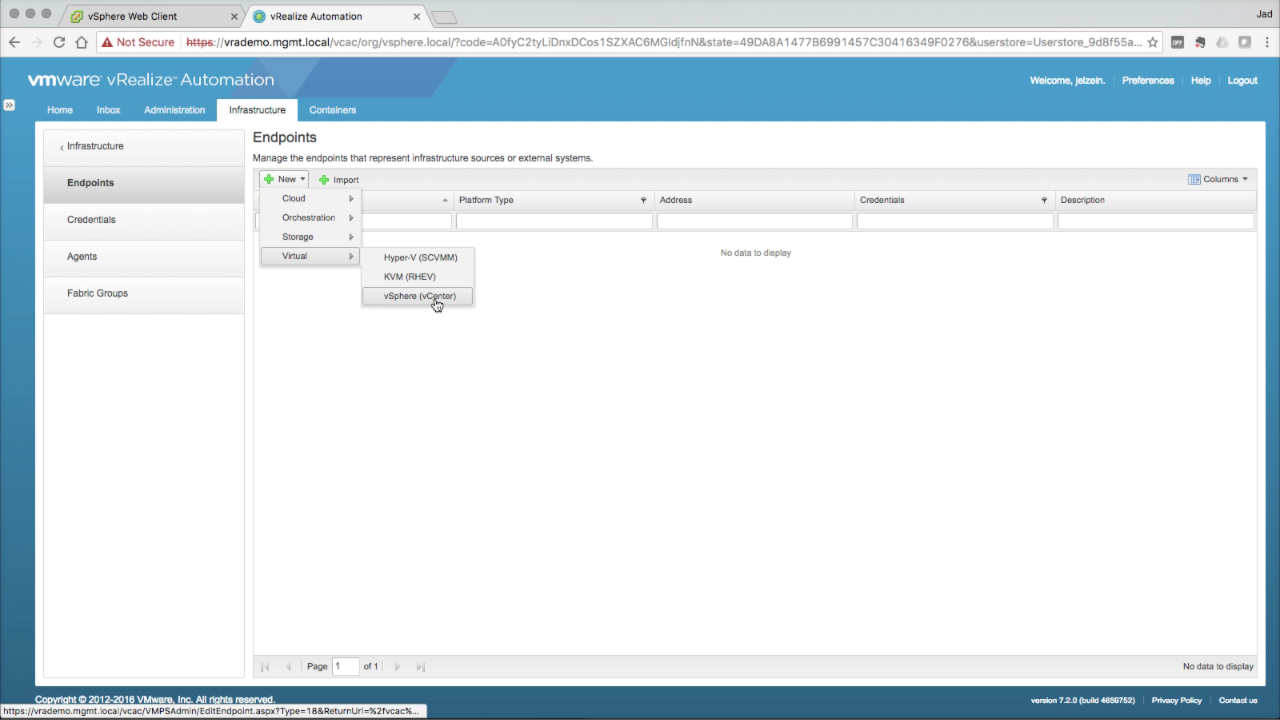
We start with the IaaS Fabric configuration by configuring an Endpoint…in this case, a vSphere Endpoint. Navigate to the Endpoints section in Infrastructure tab → Endpoints. Click the + New drop-down menu and select Virtual → vSphere (vCenter) |
|
| Configure a vSphere Endpoint
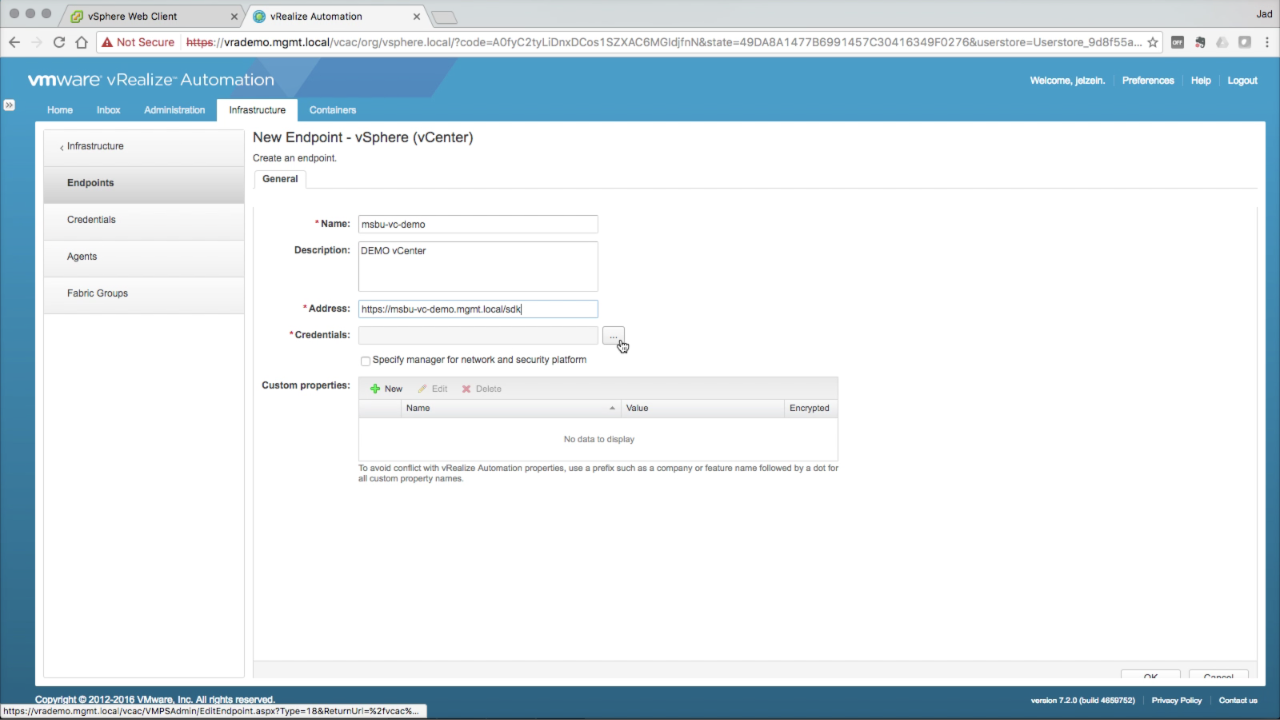
Enter the required Endpoint information:
|
|
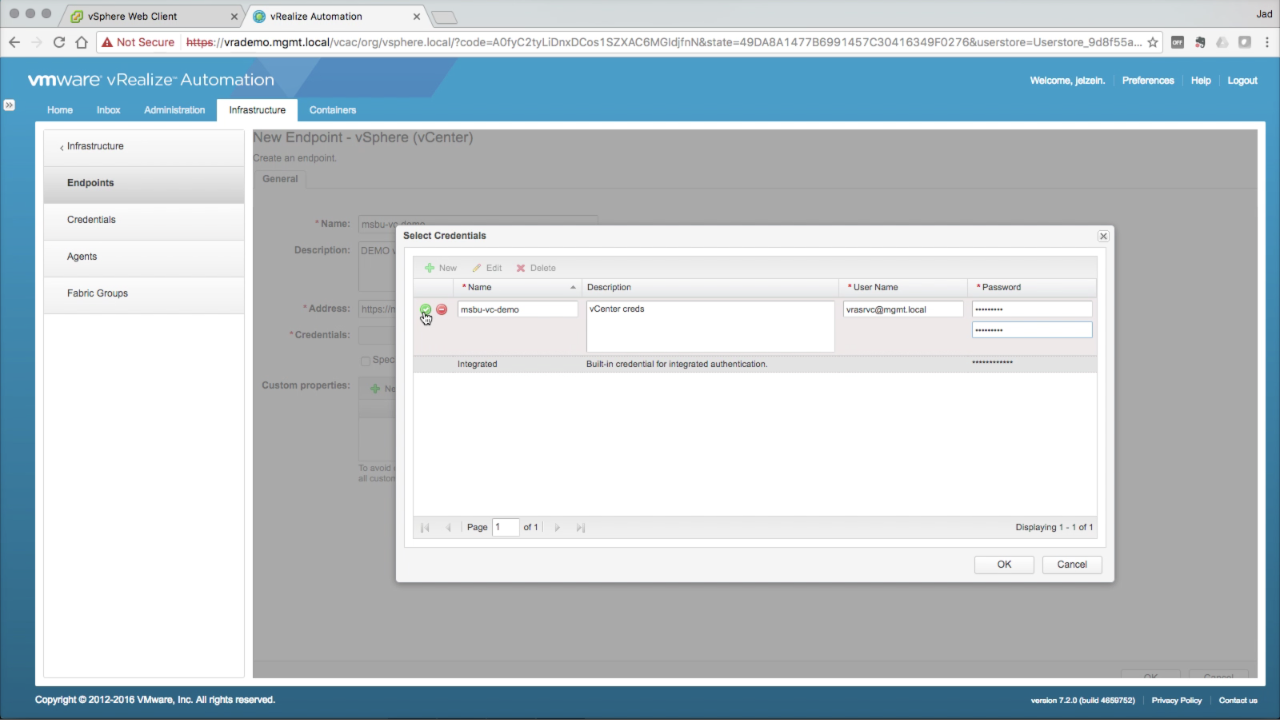
| Select Credentials
Since no credentials exist at this point, click + New to add one:
|
|
|
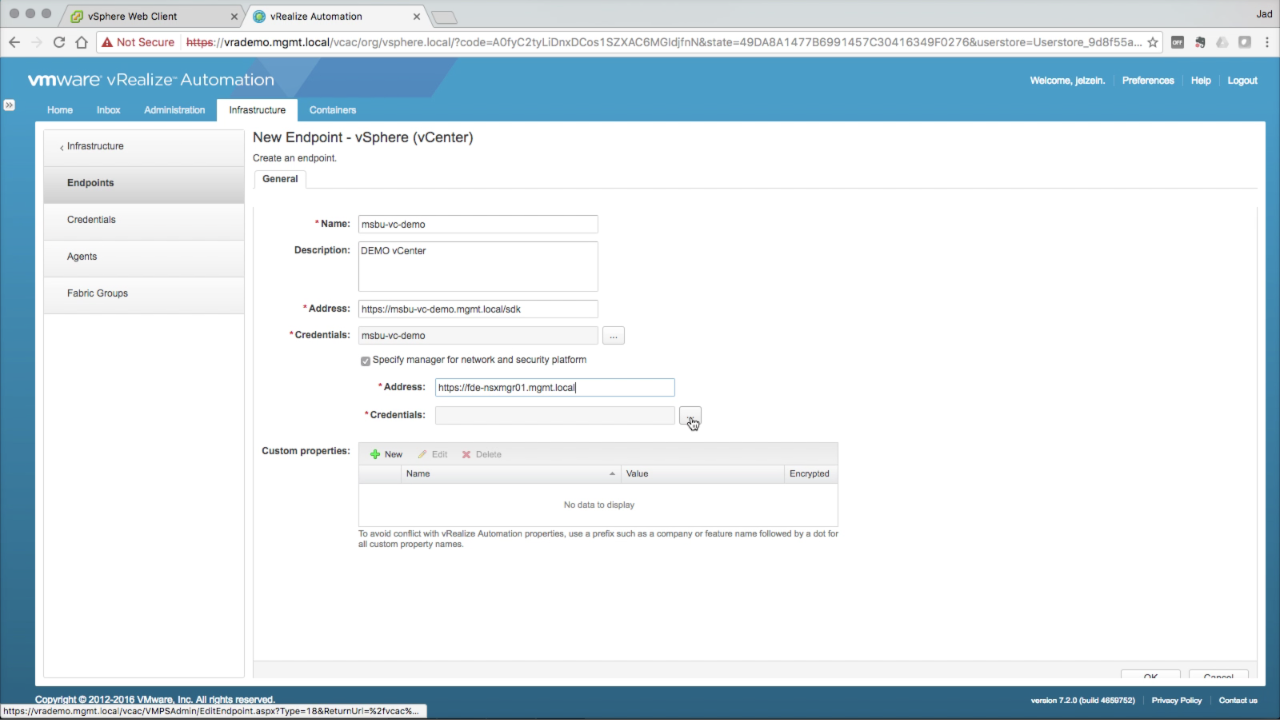
Endpoint → NSX Manager NSX integration starts with adding NSX Manager details as part of the vCenter endpoint configuration. This is optional. Since we’ll be integrating with NSX later, i’m going to go ahead and configure the endpoint here. Check the Specify manager for network and security platform option
|
|
|
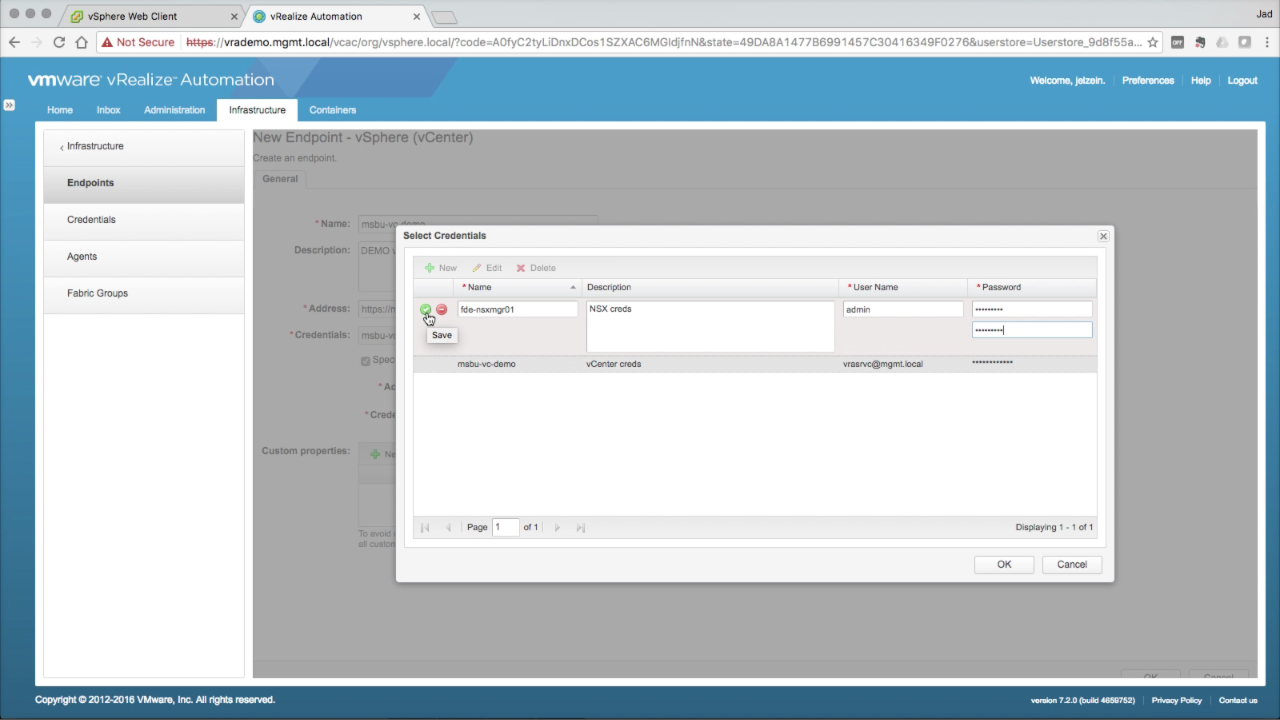
Endpoint → NSX Manager Since no NSX credentials exist at this point, click + New to add one:
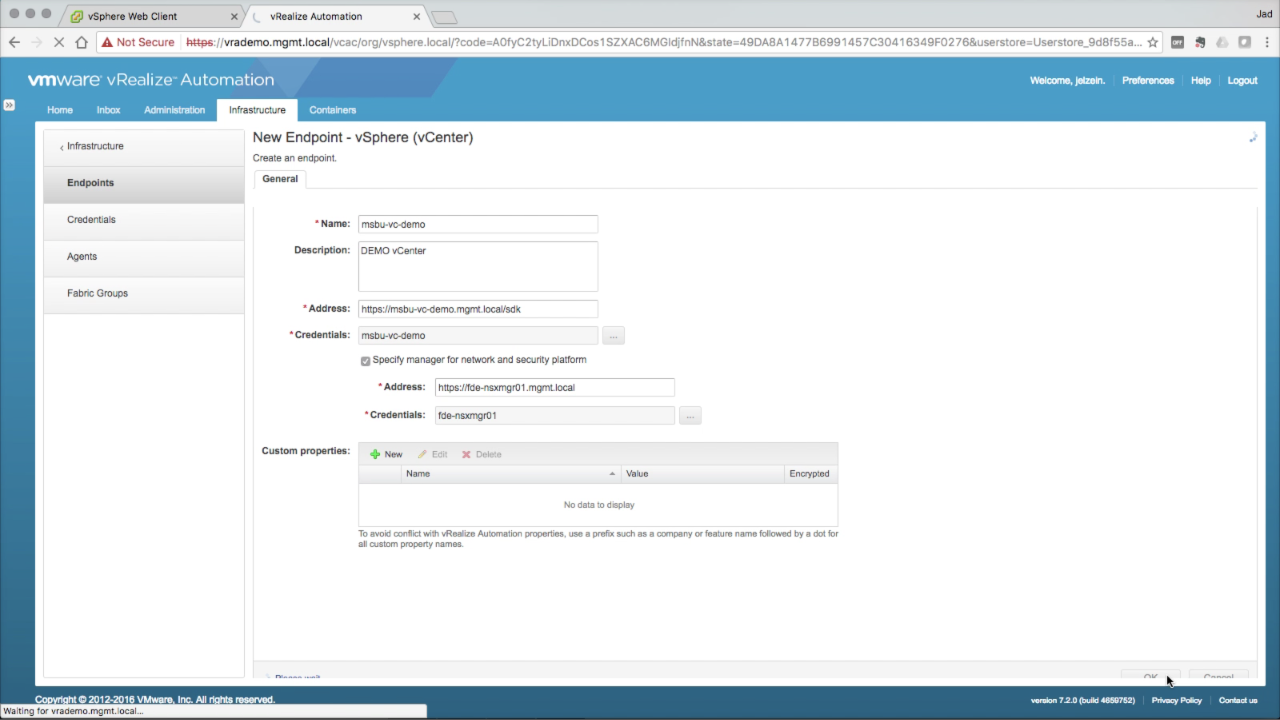
Review the Endpoint configuration and verify all the settings are accurate. A misconfiguration here will impact the rest of the fabric configuration. Click OK to add the new Endpoint. |
|
|
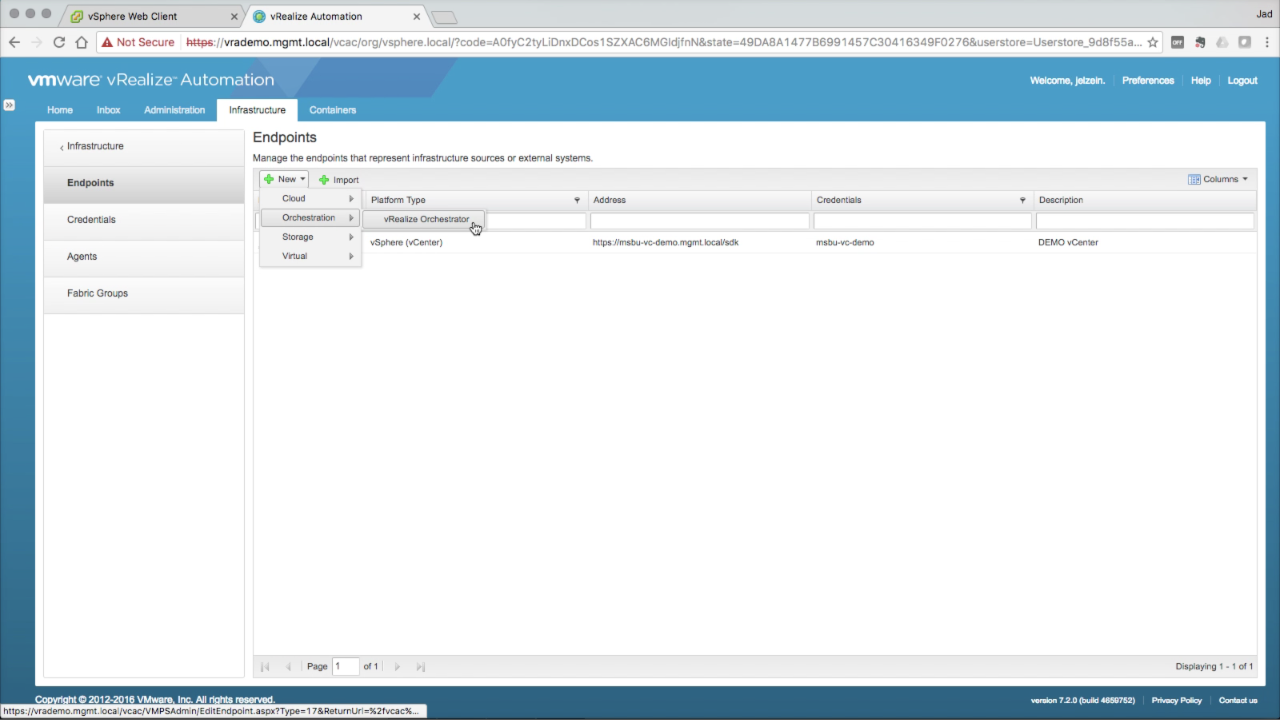
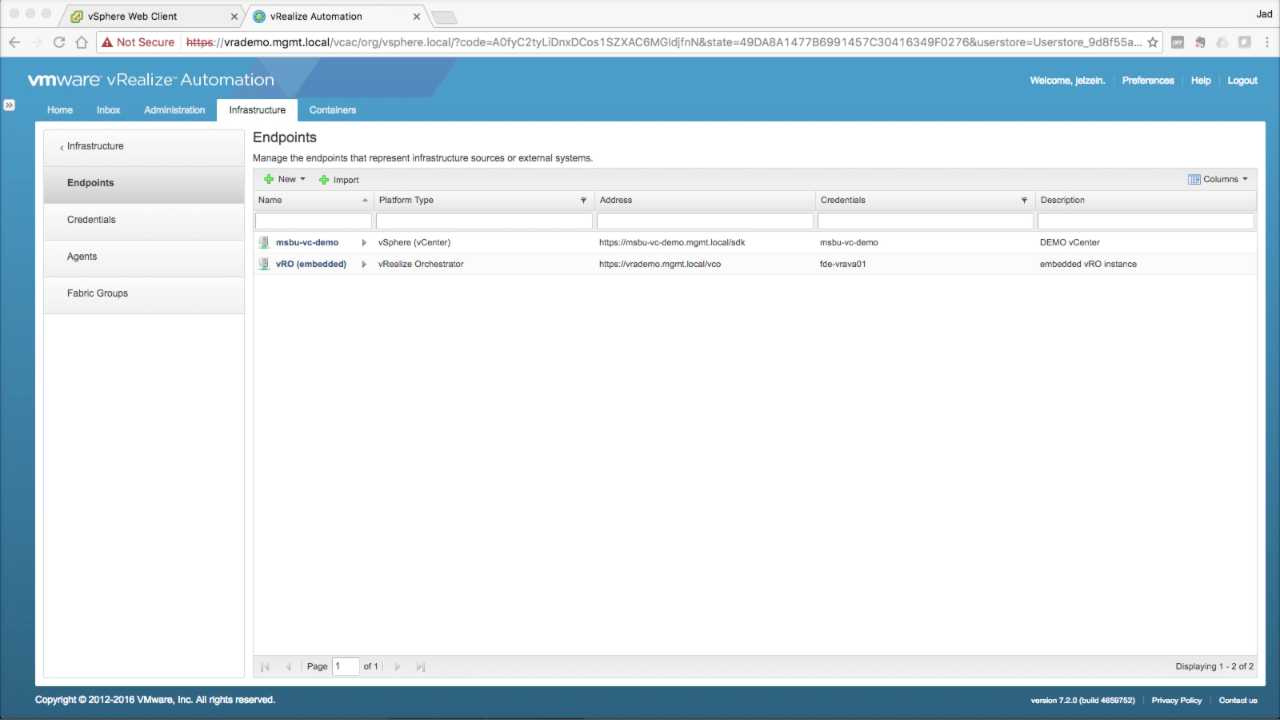
Add a vRO Endpoint Next, we’ll be adding a vRealize Orchestrator endpoint. This Endpoint is required for some extensibility use cases and is also required for NSX workflows. Click on + New and navigate to Orchestrator → vRealize Orchestrator…
NOTE: vRA uses two separate vRO configs – IaaS and Extensibility. This is the IaaS configuration used for many extensibility use cases (e.g. workflow stubs). |
|
|
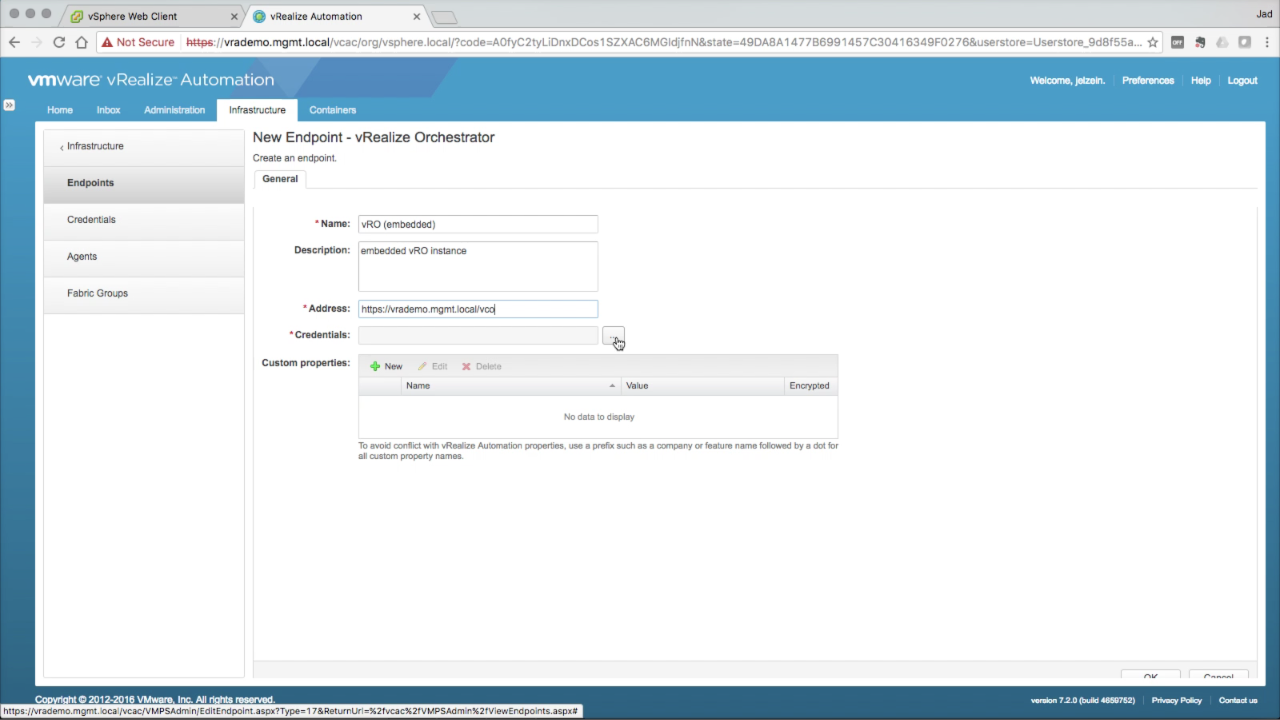
Add a vRO Endpoint Enter the required endpoint details:
NOTE: We will be using the embedded vRO instance as the vRO endpoint. |
|
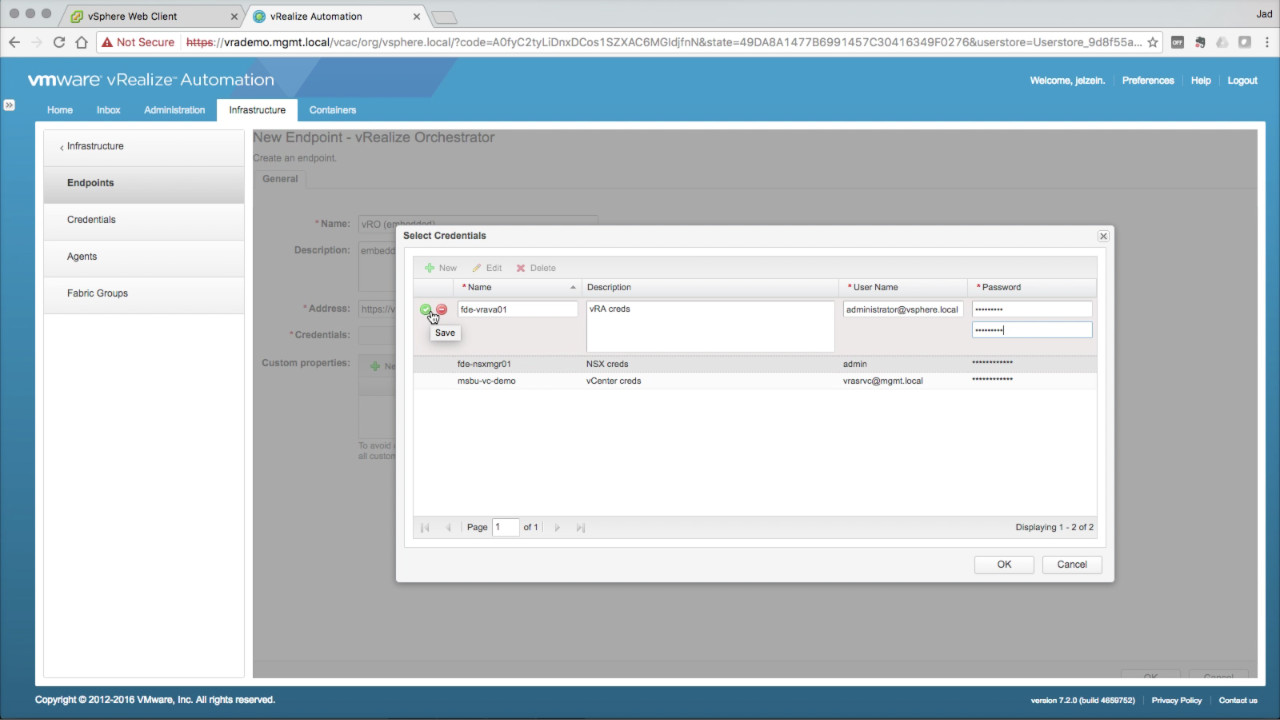
| vRO Endpoint → Credentials
Since no vRO credentials exist at this point, click + New to add one:
|
|
| Add a vRO Endpoint
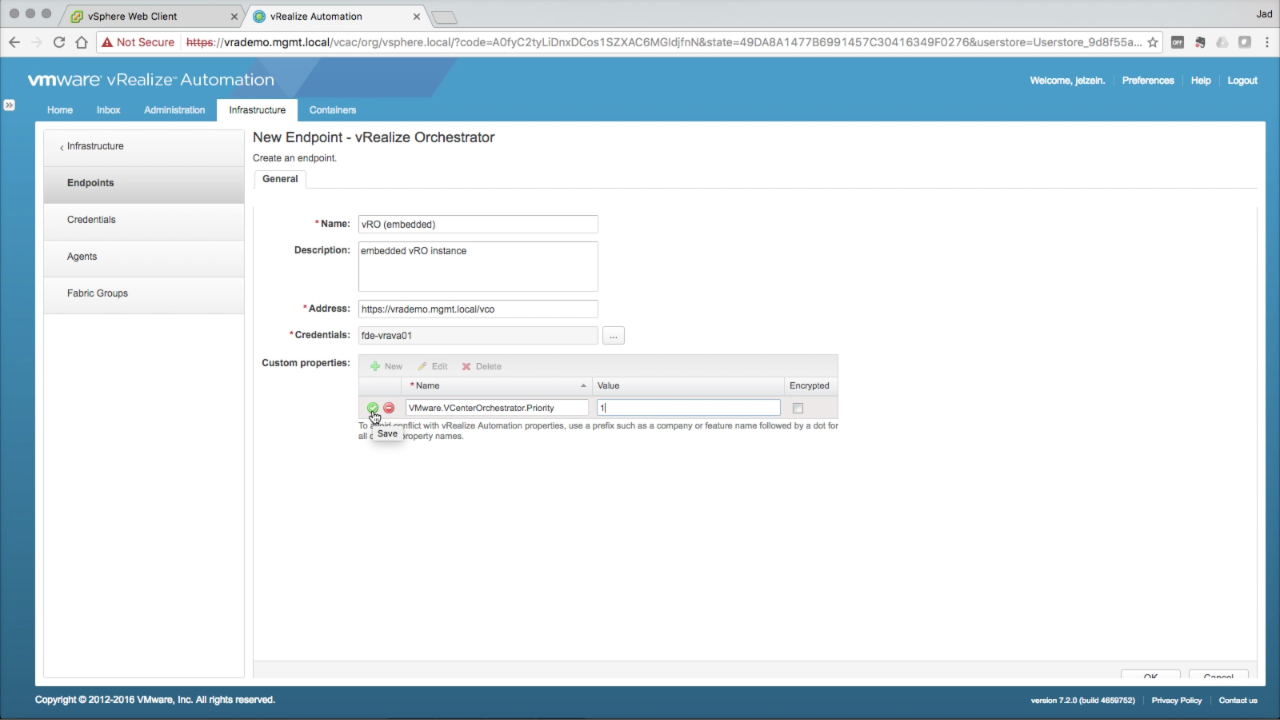
A custom property is used to assign a priority to the configured vRO instance. This allows the use of multiple vRO endpoints and the ability to select which one will handle the request. Click New to add a new custom property:
Click OK to add the vRO Endpoint. |
|
| Configure Endpoints
You should end up with 2 Endpoints – vCenter and vRO. Once this step is complete, navigate to the Fabric Groups sections… |
|
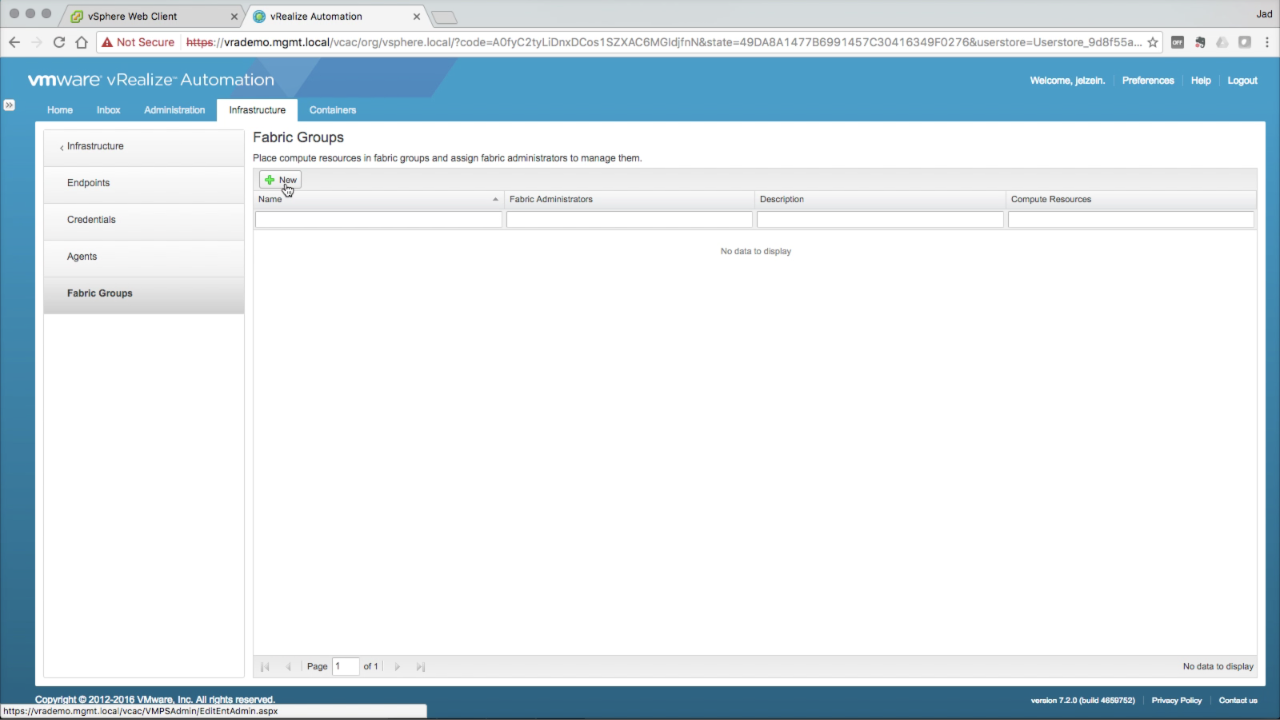
| Fabric Groups
A Fabric Group is added to assign one or more discovered resources (e.g. vSphere clusters) to Fabric Administrators for management. Click + New to add a new Fabric Group… |
|
|
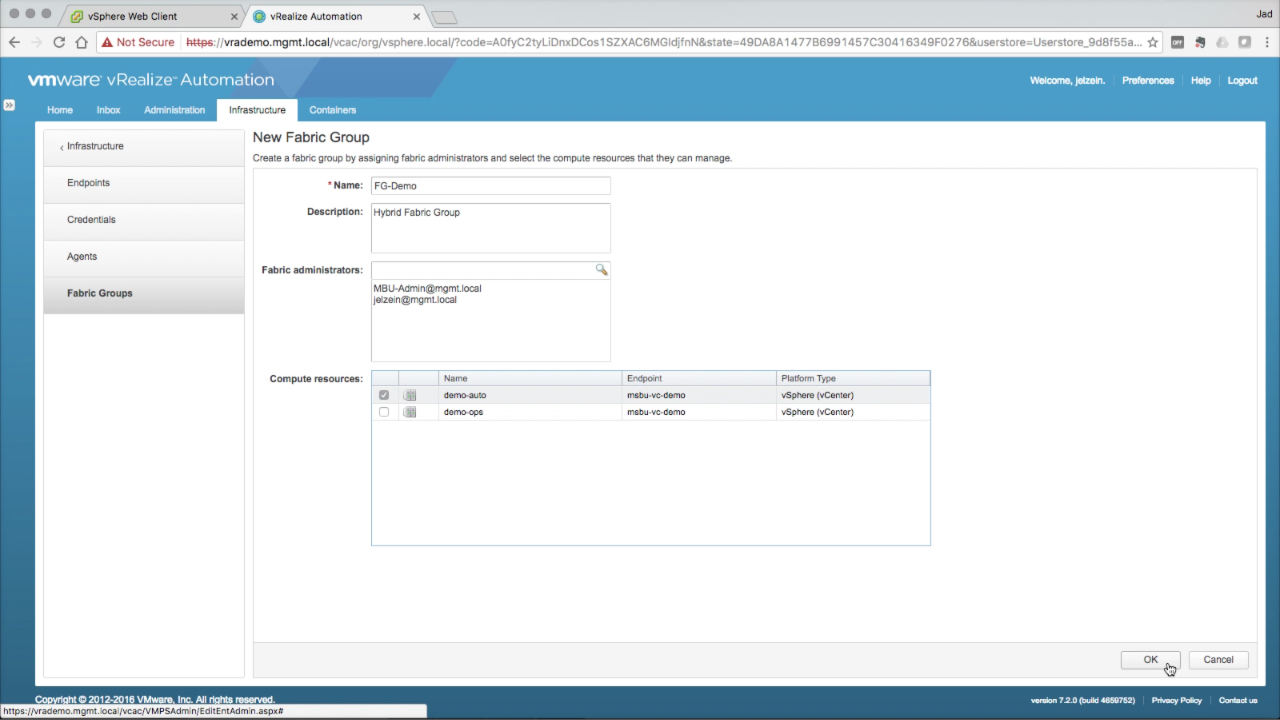
Add a Fabric Group Enter the required information:
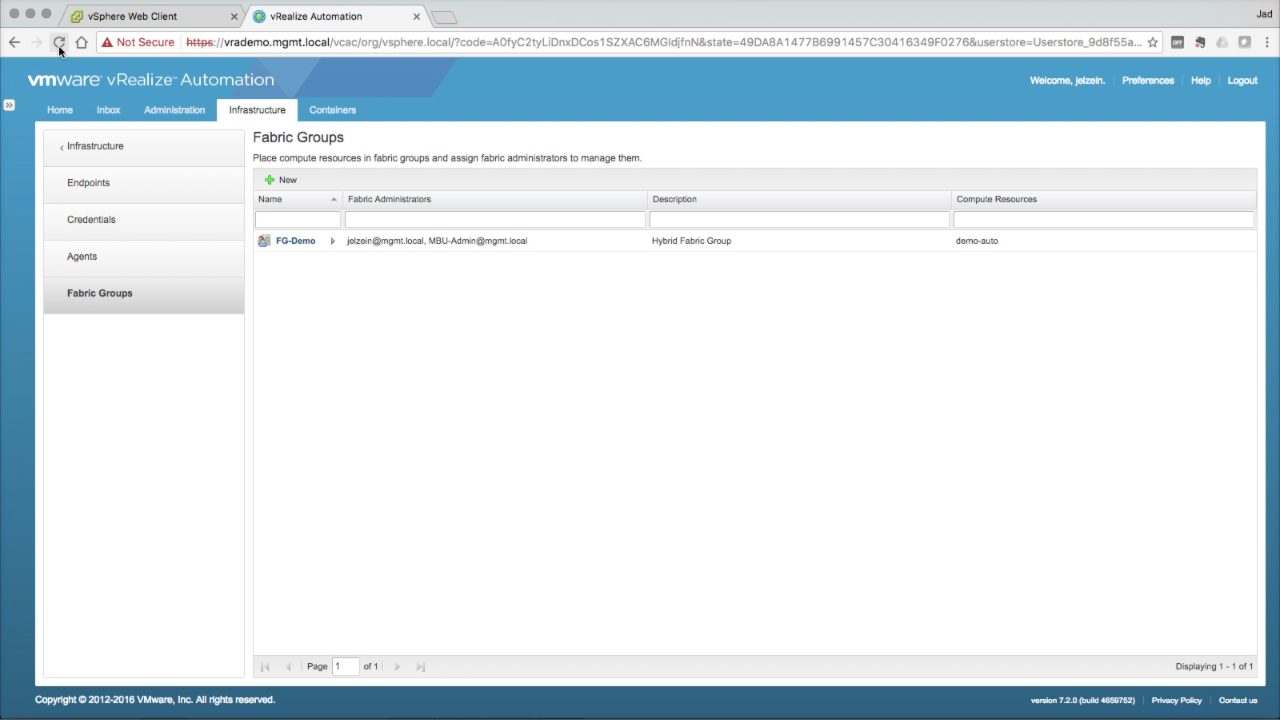
Select one or more Compute Resources. In this example, i’m selecting the vSphere cluster “demo-auto”. Once completed, click OK to create the new Fabric Group.
NOTE: If no Compute Resources are available, you either haven’t allowed enough time for a data collection to complete or the Endpoint was misconfigured. Double-check to make sure the endpoint name in vRA matches the name used when installing the vSphere agent. Refer to the IaaS logs to begin troubleshooting (Infrastructure tab → Monitoring → Logs) |
|
| Custom Groups (optional)
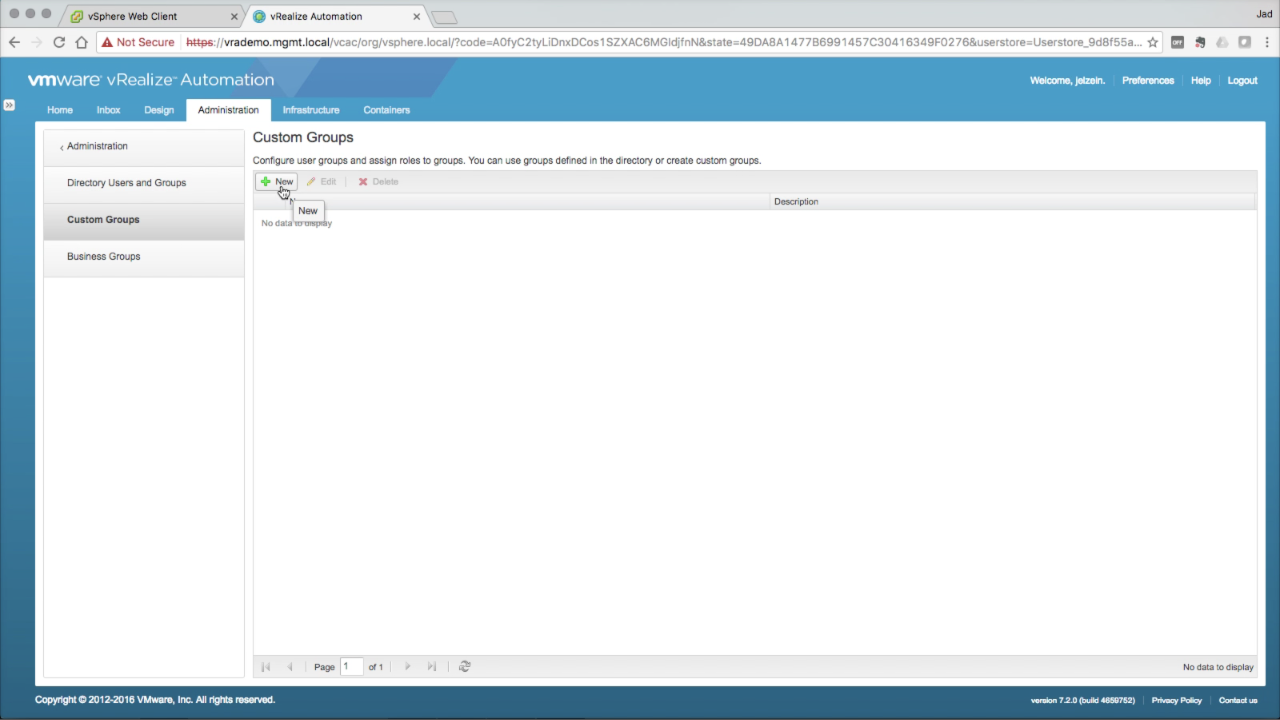
You can create Custom Groups within vRA that include external Users and Groups (e.g. AD). The Custom Group can then be assigned functional Roles that impact all members of the group. Click + New to create a new Custom Group… |
|
| Custom Groups → General
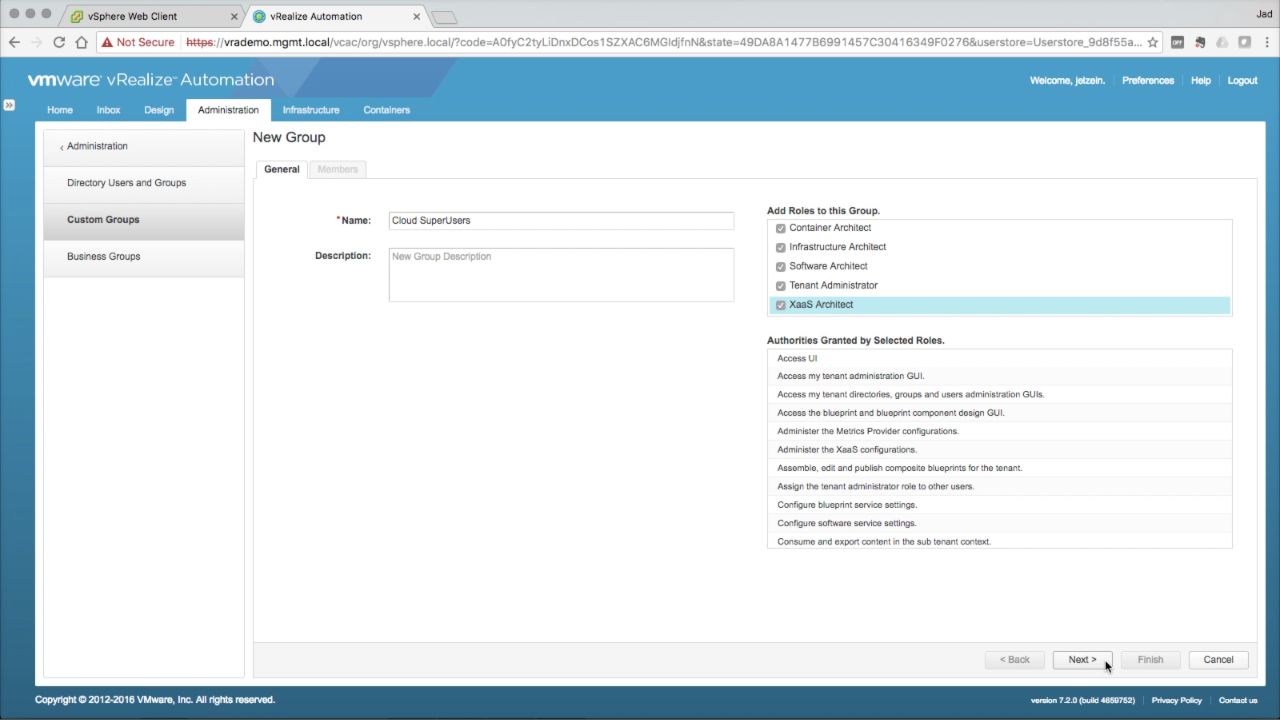
In the General tab, enter a Name for the group and select the vRA Roles to be assigned to the group. In this example, I’m creating a cloud “superusers” group and granting all roles. The result is a group with super admin rights to vRA (not necessarily a best practice…but it makes building documentation much easier). Click Next when done… |
|
| Custom Groups → Members
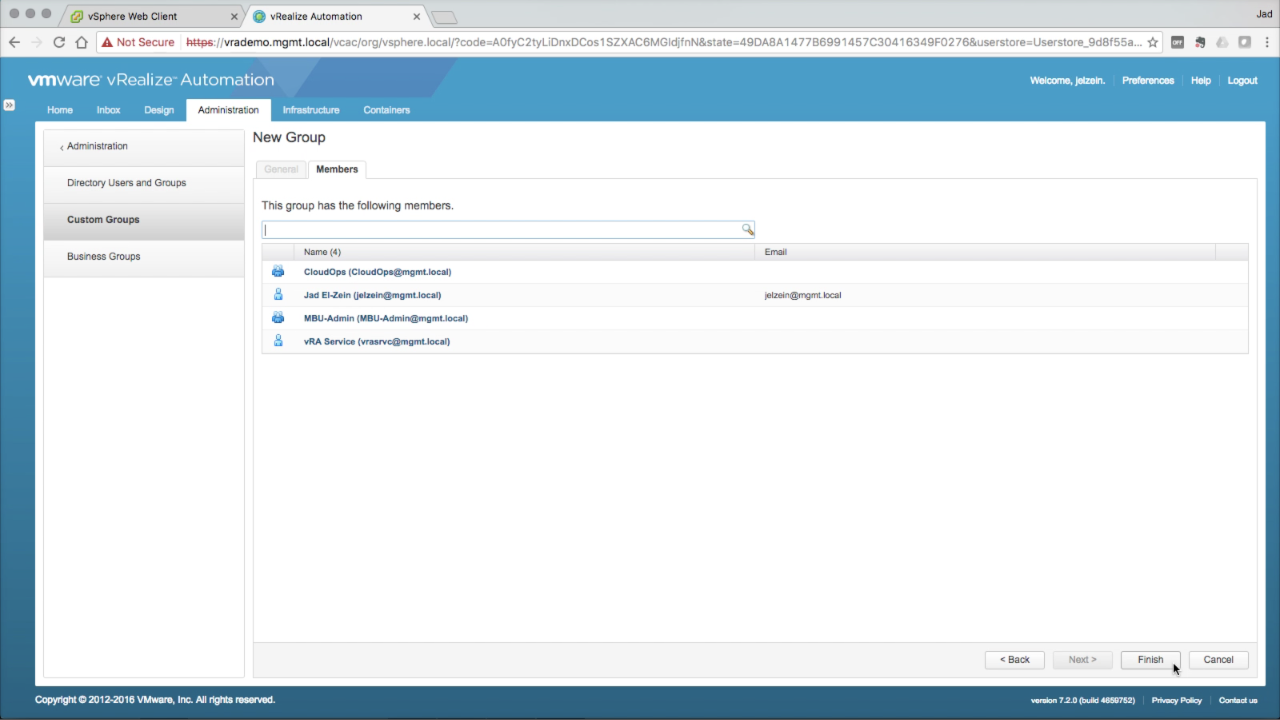
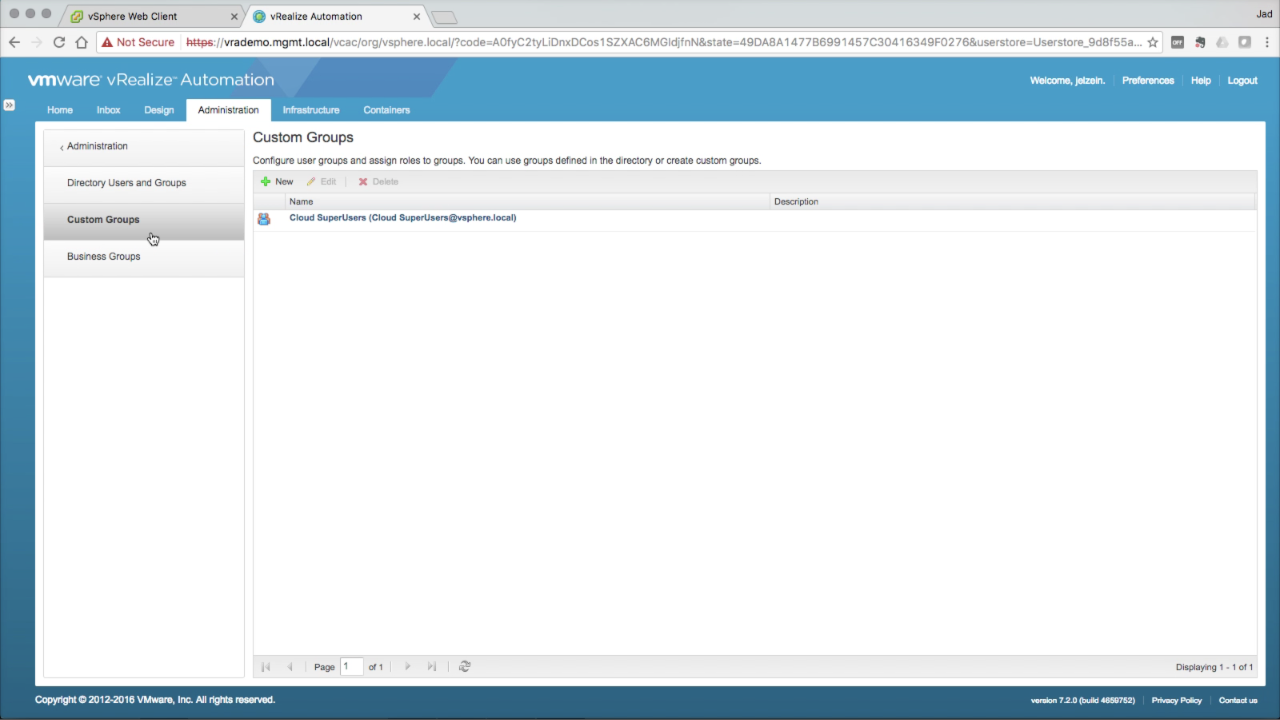
In the Members tab, enter one ore more users and groups to add to the custom group. These users and groups will inherit the roles assigned to the parent group. The source of these users and groups can be local or from any configured directory. Click Finish to create the custom group. |
|
| Machine Prefixes
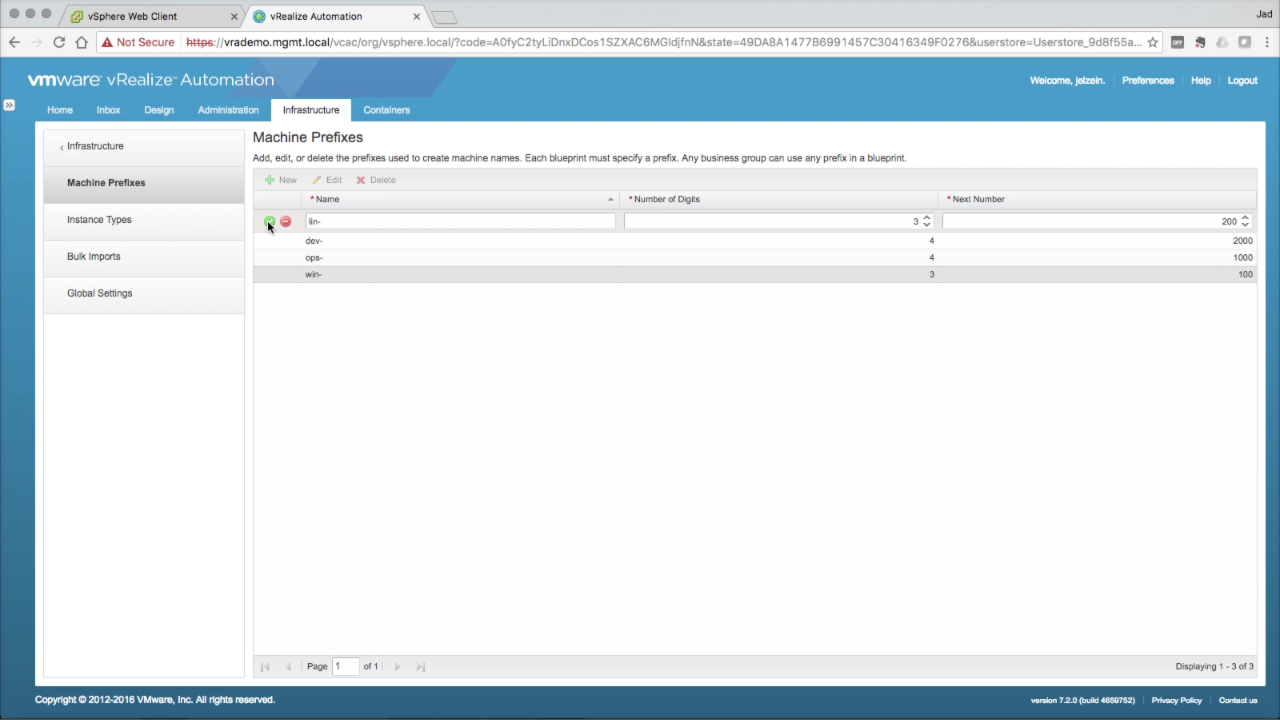
Machine Prefixes are simple policies that are used to for machine naming. Navigate to Infrastructure tab → Administration → Machine Prefixes Click + New to add a new machine prefix:
Add additional prefixes as needed. |
|
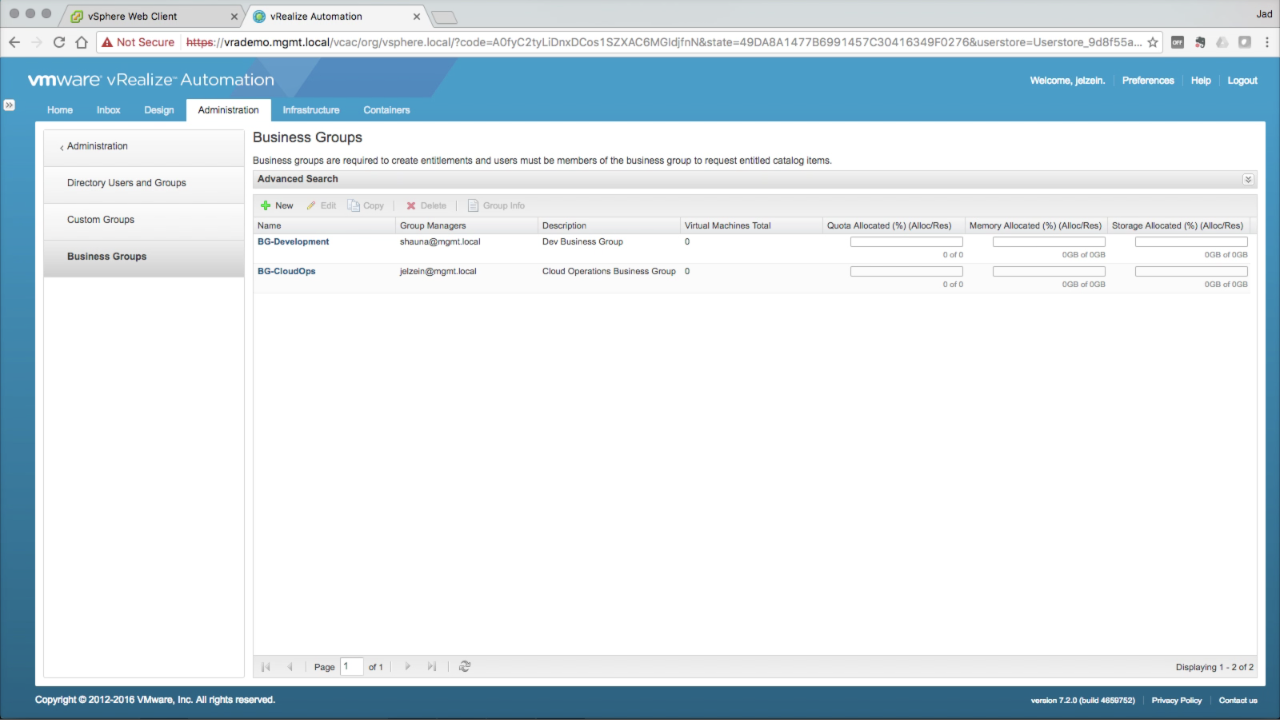
| Business Groups | |
|
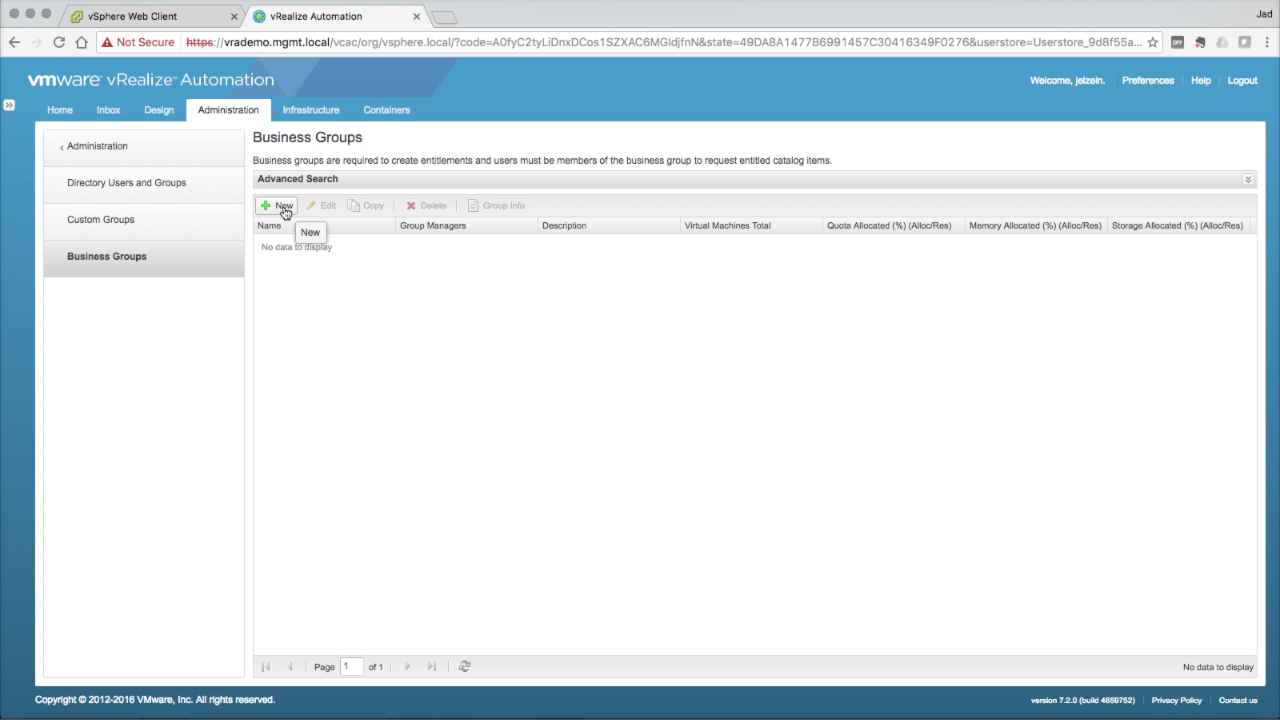
Business Groups Business Groups are created to represent a group of users that will consume catalog services (based on entitlement). Click + New to add a new Business Group…
A user must be part of a Business Group in order to be entitled to catalog services. |
|
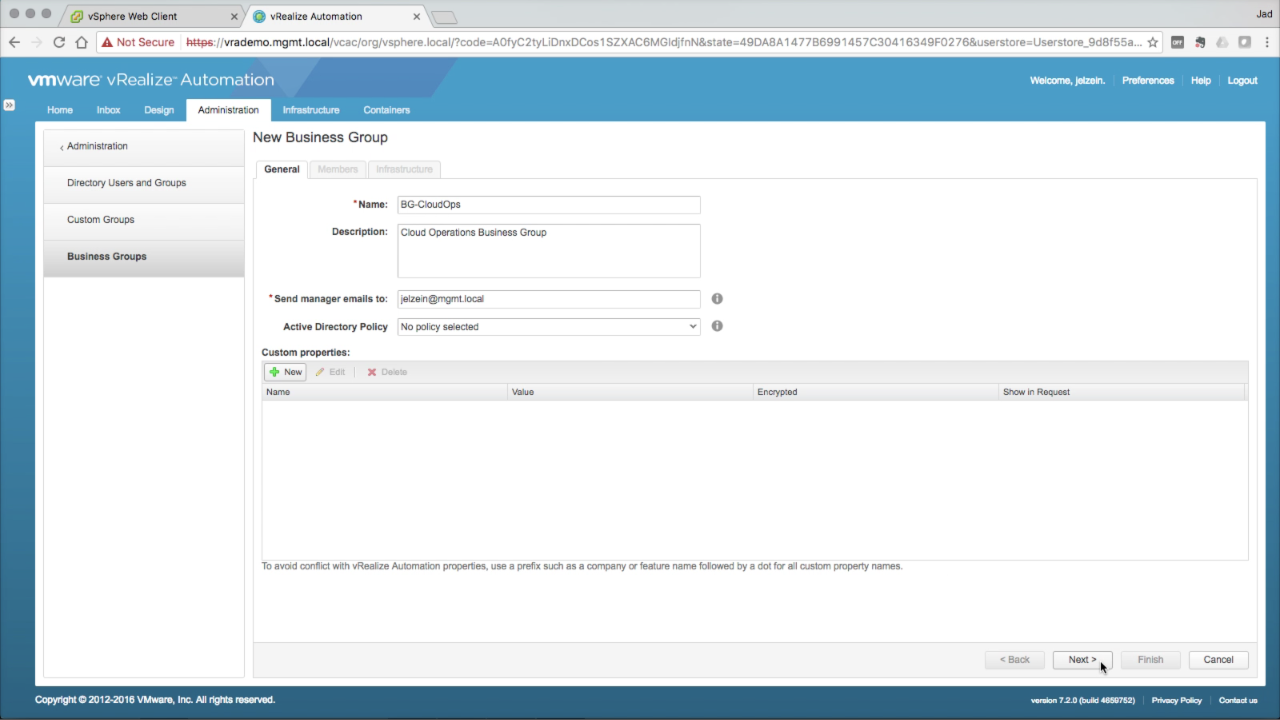
| Business Group → General
In the General tab, enter the required information:
Click Next to continue… |
|
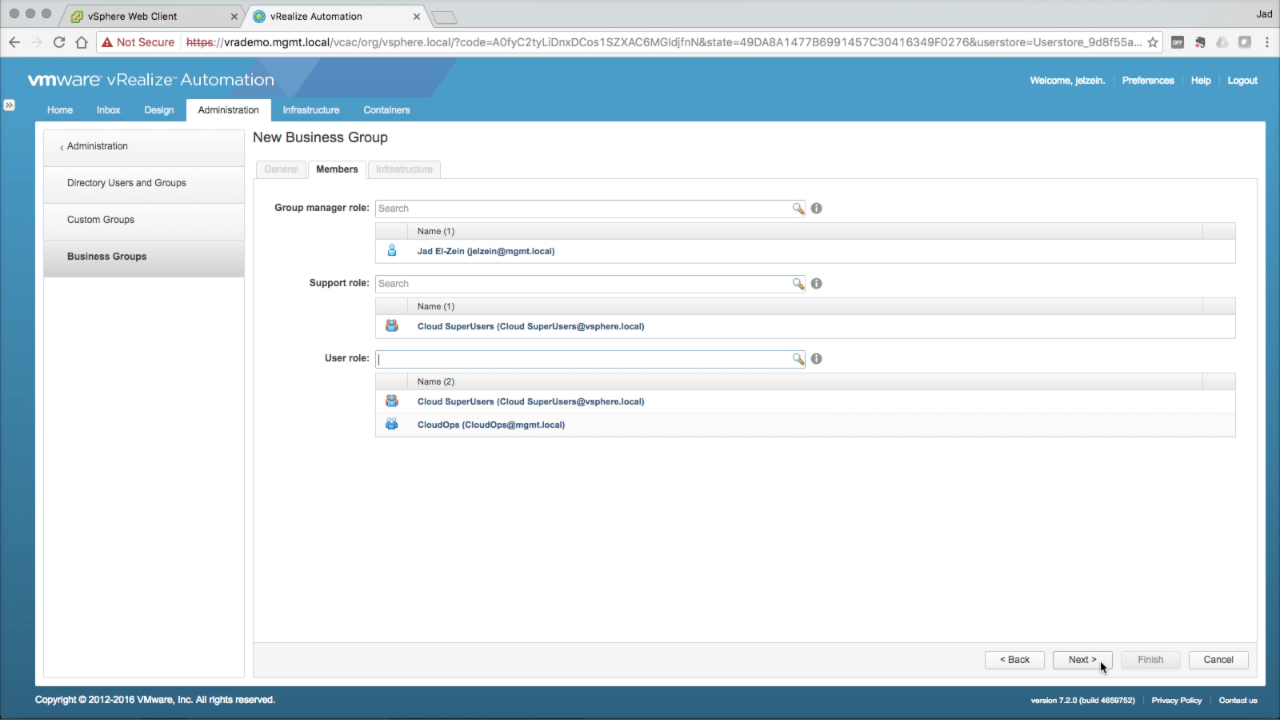
| Business Group → Members
In the Members tab, add users or groups to each of the roles:
Click Next to continue… |
|
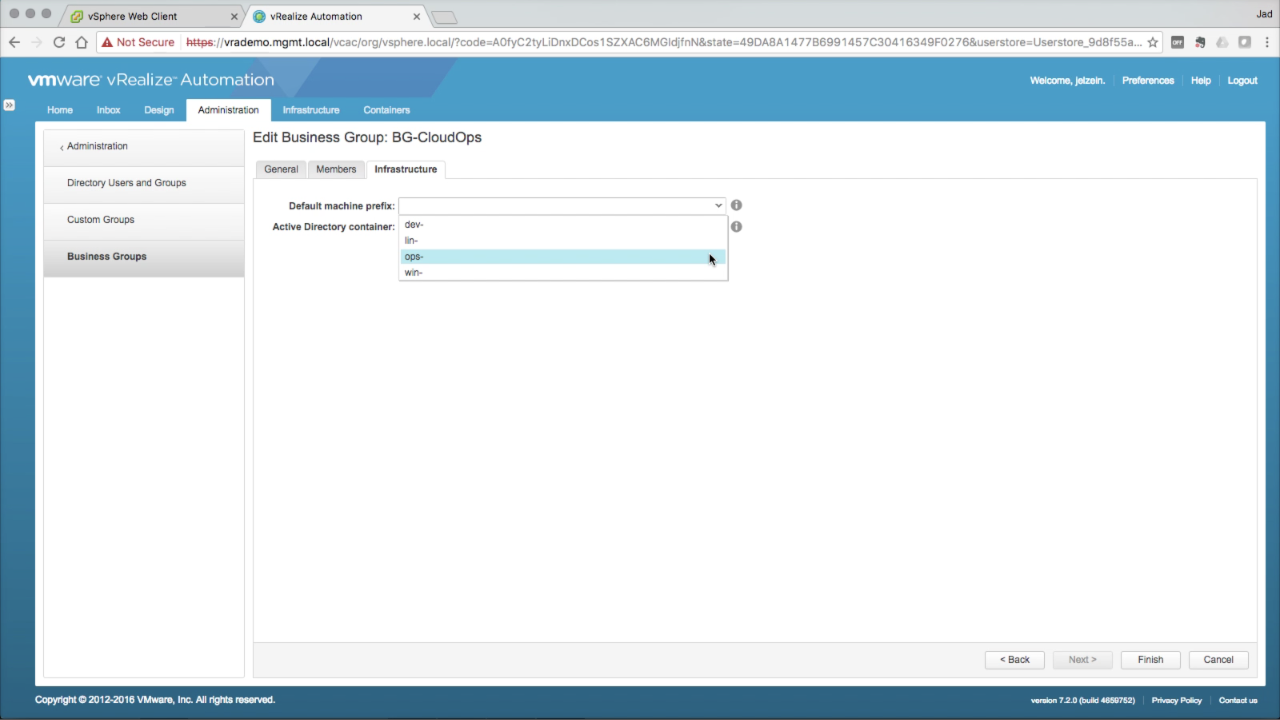
| Business Group → Infrastructure
In the Infrastructure tab, use the Default machine prefix drop-down to select an available prefix (created in a previous step). Keep Active Directory container empty (this is not used for vSphere provisioning). Click Finish to save the new Business Group. |
|
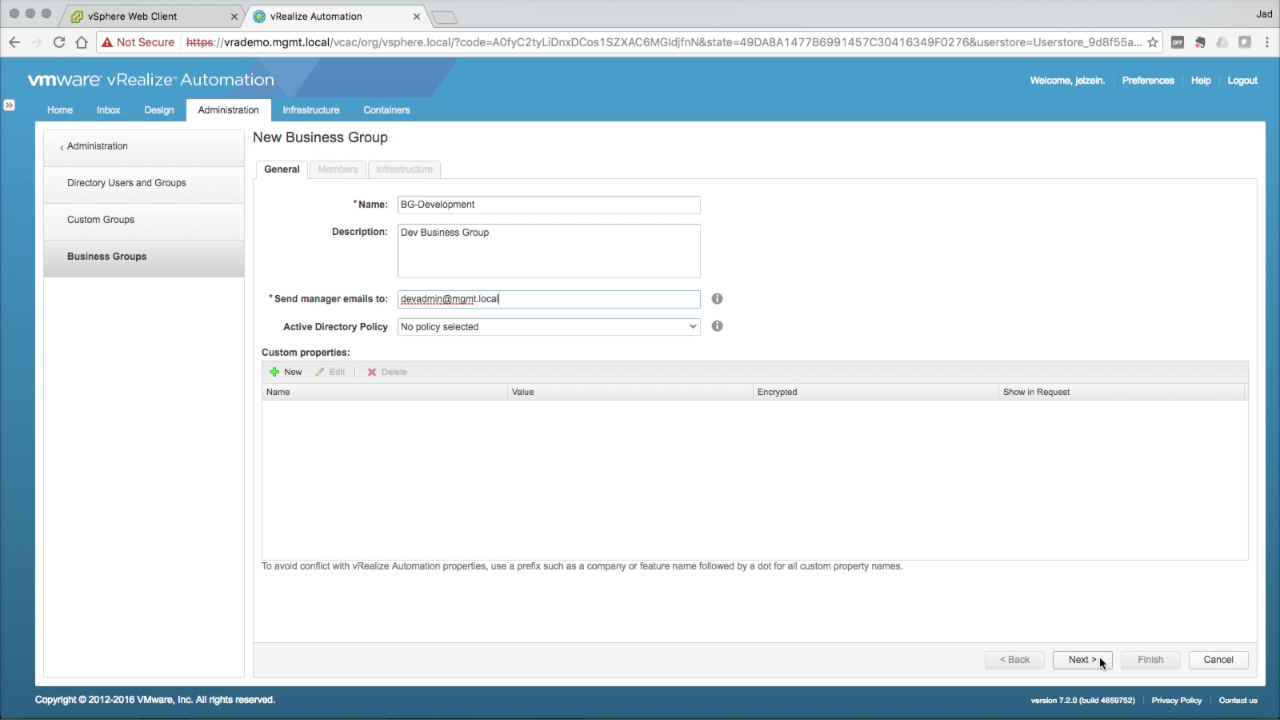
| New Business Group
Optionally, create an additional Business Group following the same steps as above… Click + New to add a new Business Group… In the General tab, enter the required information:
Click Next to continue… |
|
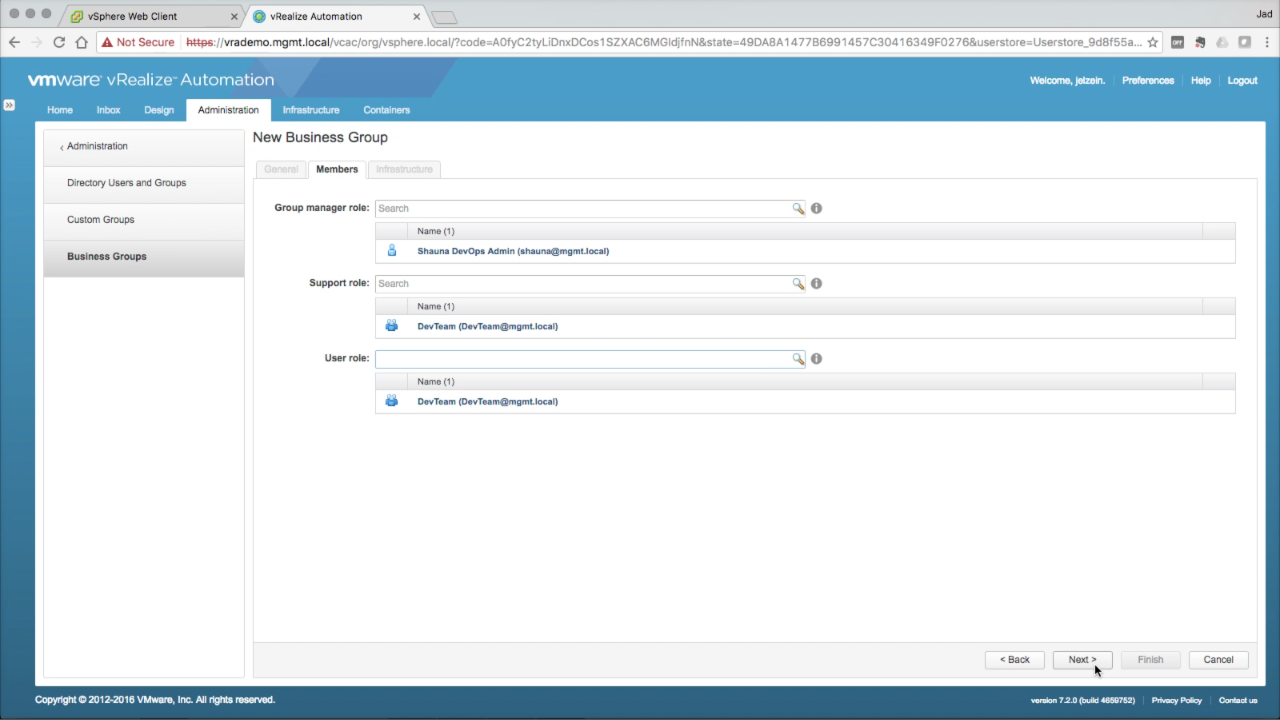
| Business Groups → Members
In the Members tab, add users or groups to each of the roles:
Click Next to continue… |
|
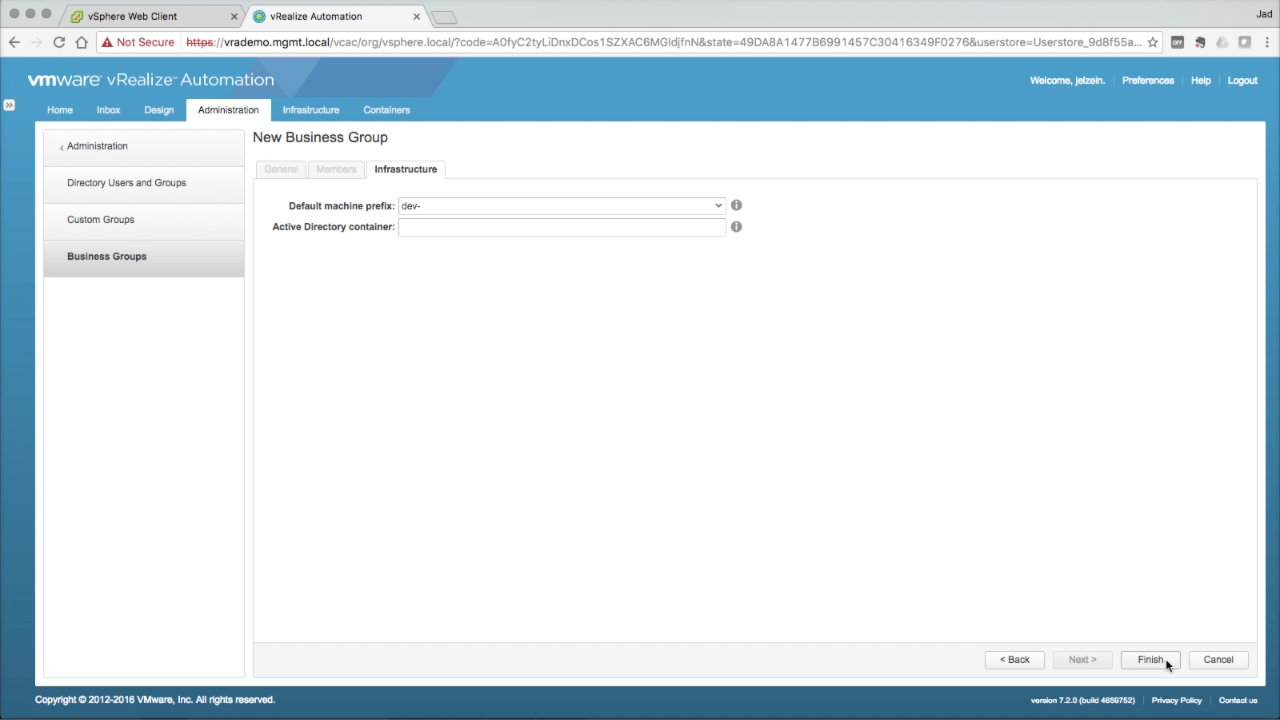
| Business Groups → Infrastructure
In the Infrastructure tab, use the Default machine prefix drop-down to select an available prefix Keep Active Directory container empty (this is not used for vSphere provisioning). Click Finish to save the new Business Group. Once created, business groups are assigned fabric resources (in the form of Reservations) and granted access to catalog services (Entitlements). |
|
| Network Profiles | |
| Network Profiles
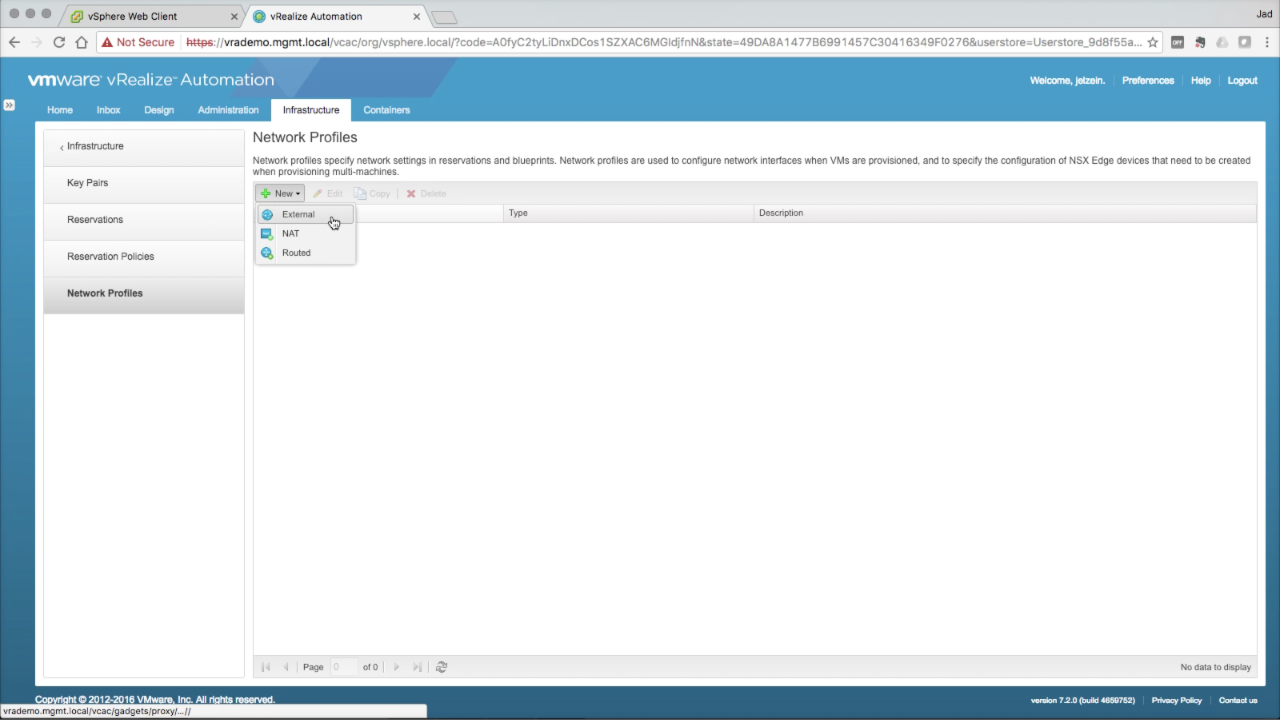
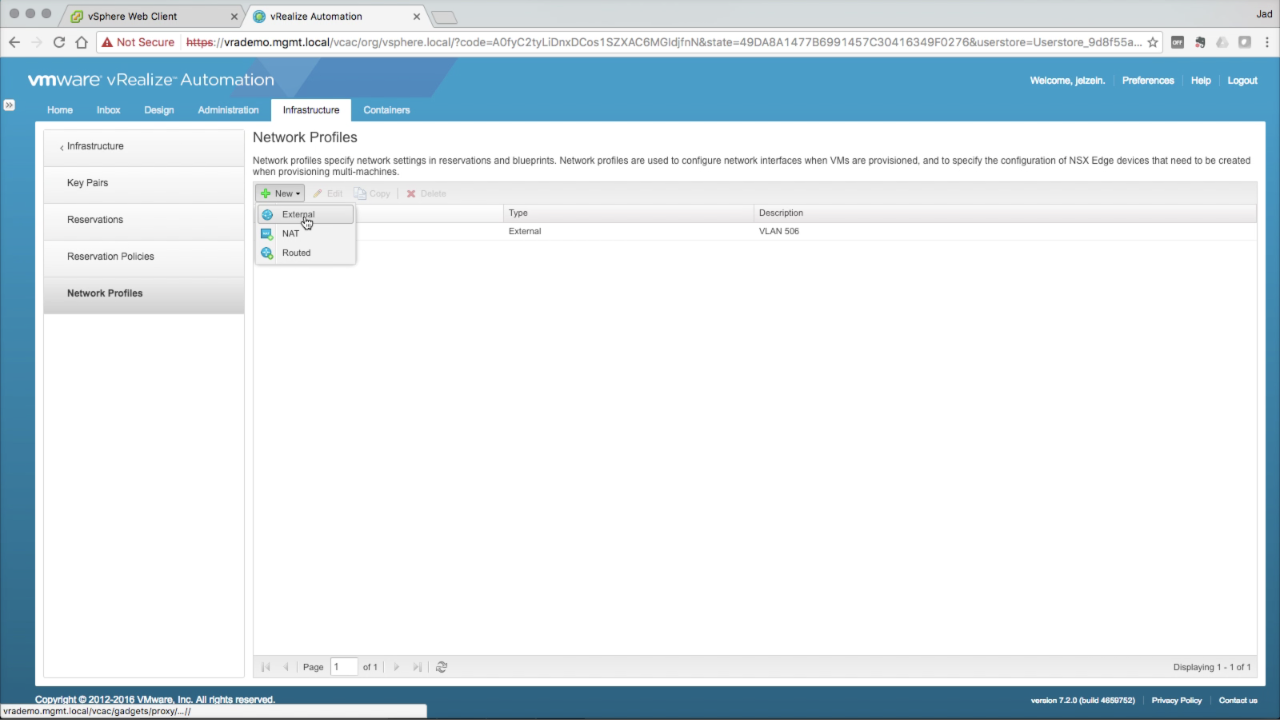
You’ll need to add one or more Network Profiles to specify the network configuration details for the networks that machines will use. Network Profiles are bound to corresponding networks in Reservations (covered next). Click + New → External to create an External network profile… |
|
|
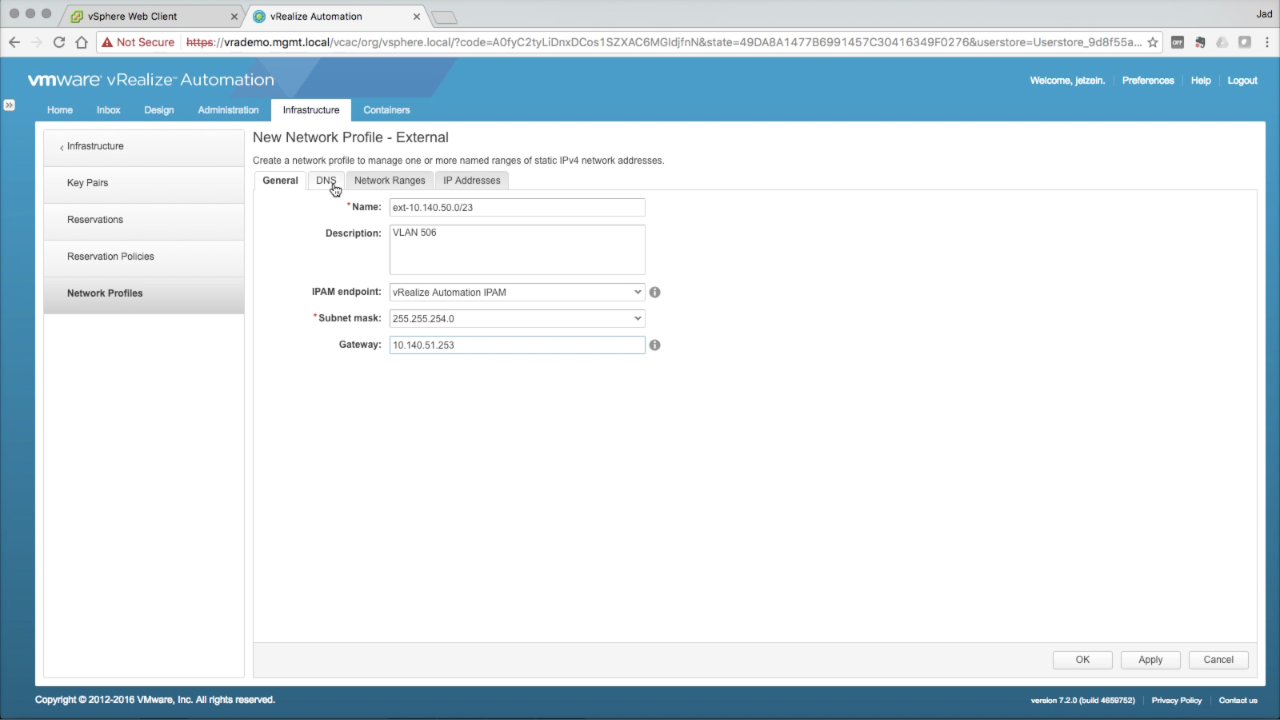
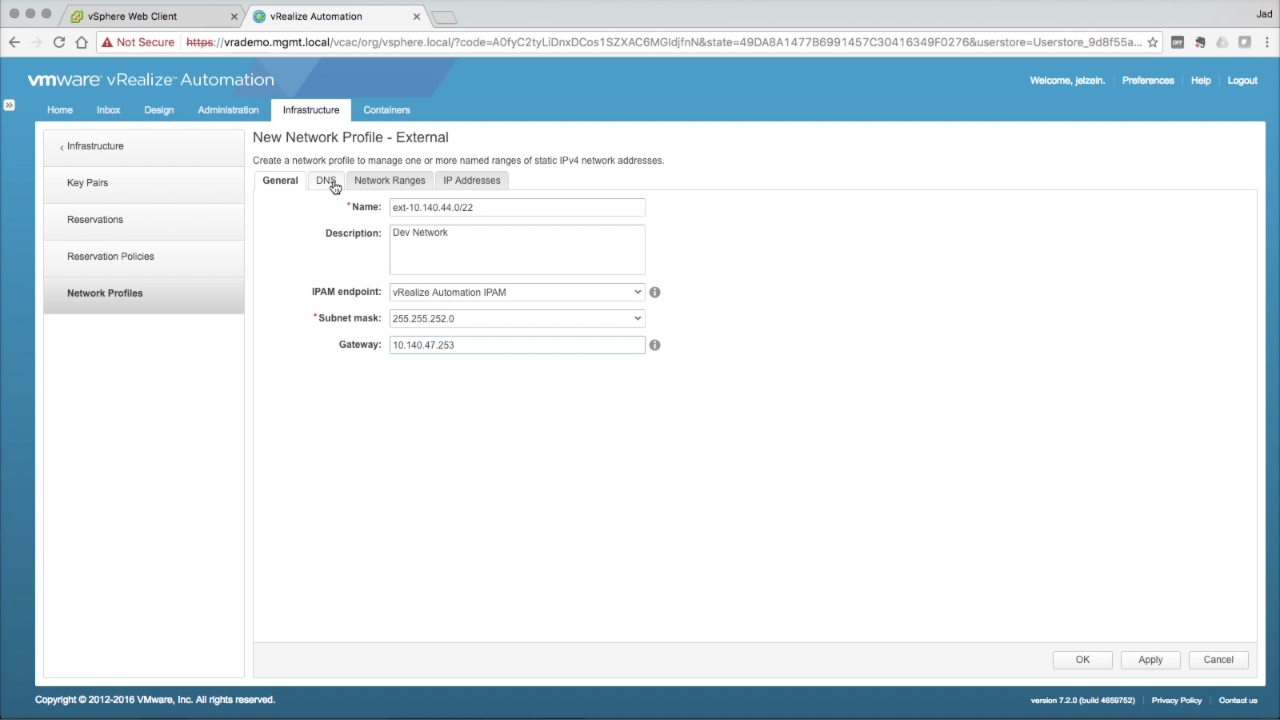
Network Profile → General In the General tab, enter the required details:
Click on the DNS tab…
NOTE: vRA also supports Infoblox IPAM, which is configured separately |
|
|
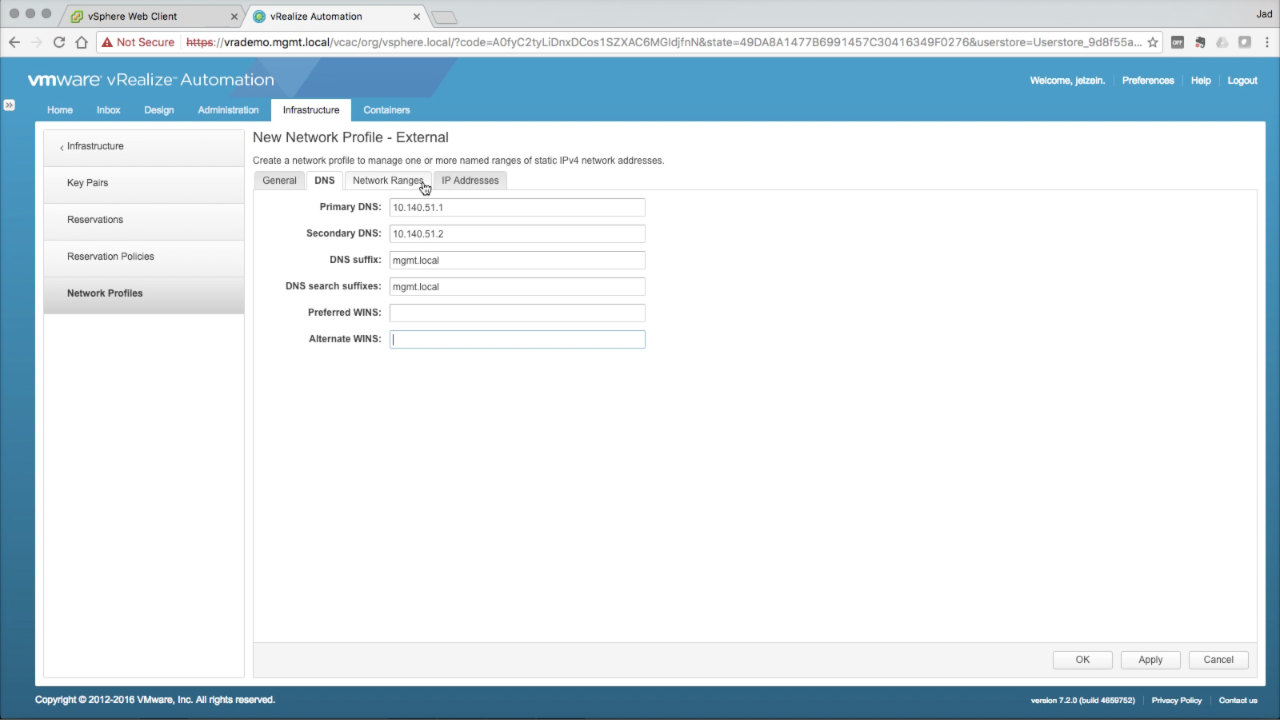
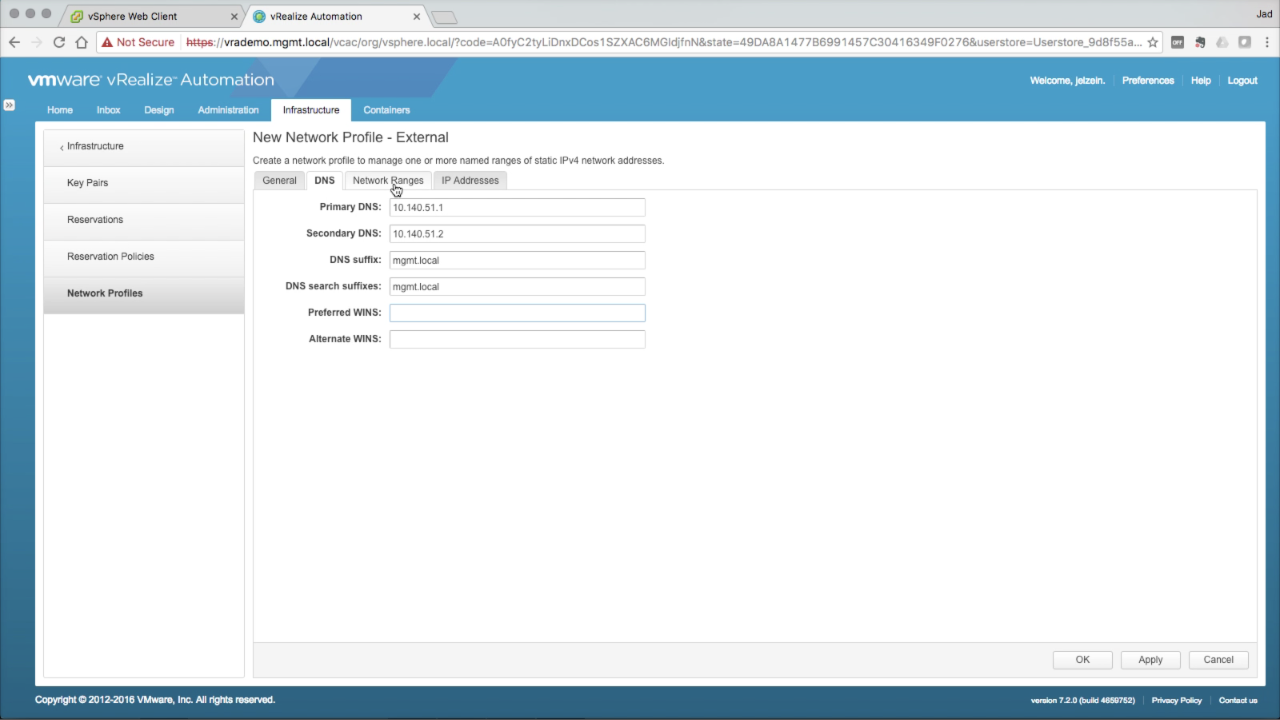
Network Profile → DNS In the DNS tab, enter the optional DNS details:
Click on the Network Ranges tab to continue…
NOTE: DNS settings are optional, but definitely recommend to be configured. Provisioned machines will be configured with this info during deployment (unless DHCP is being used). |
|
|
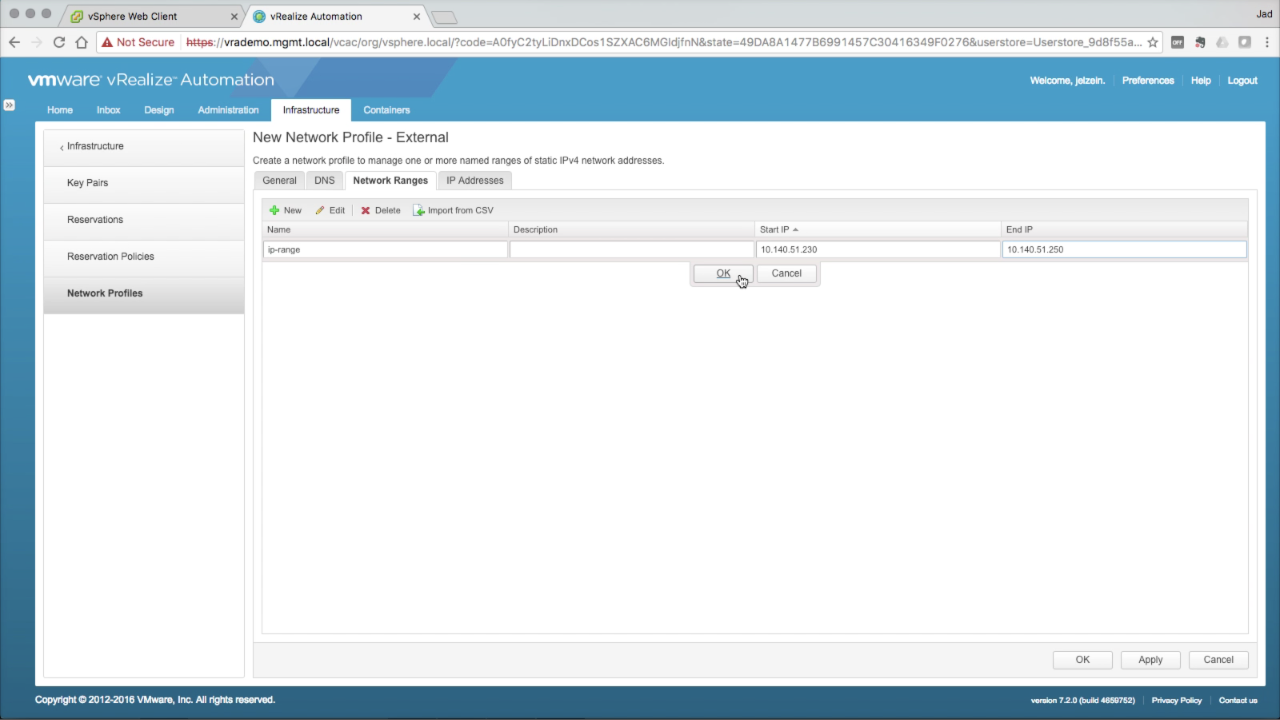
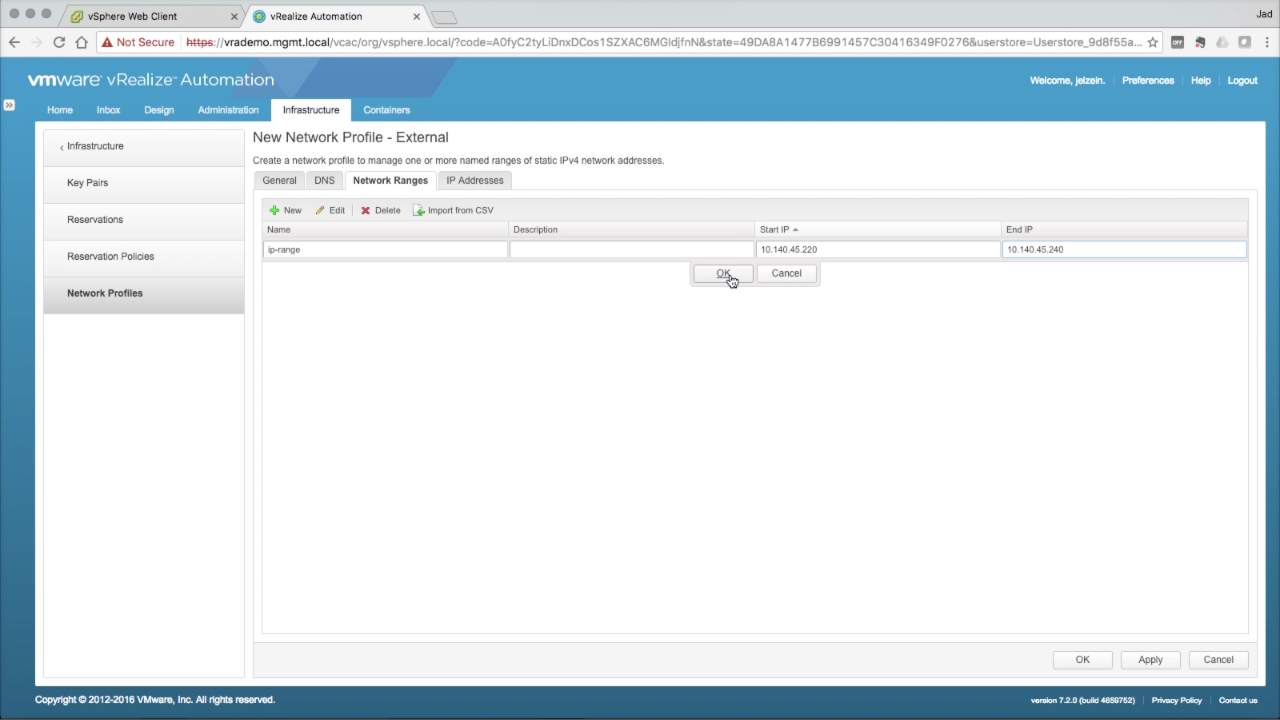
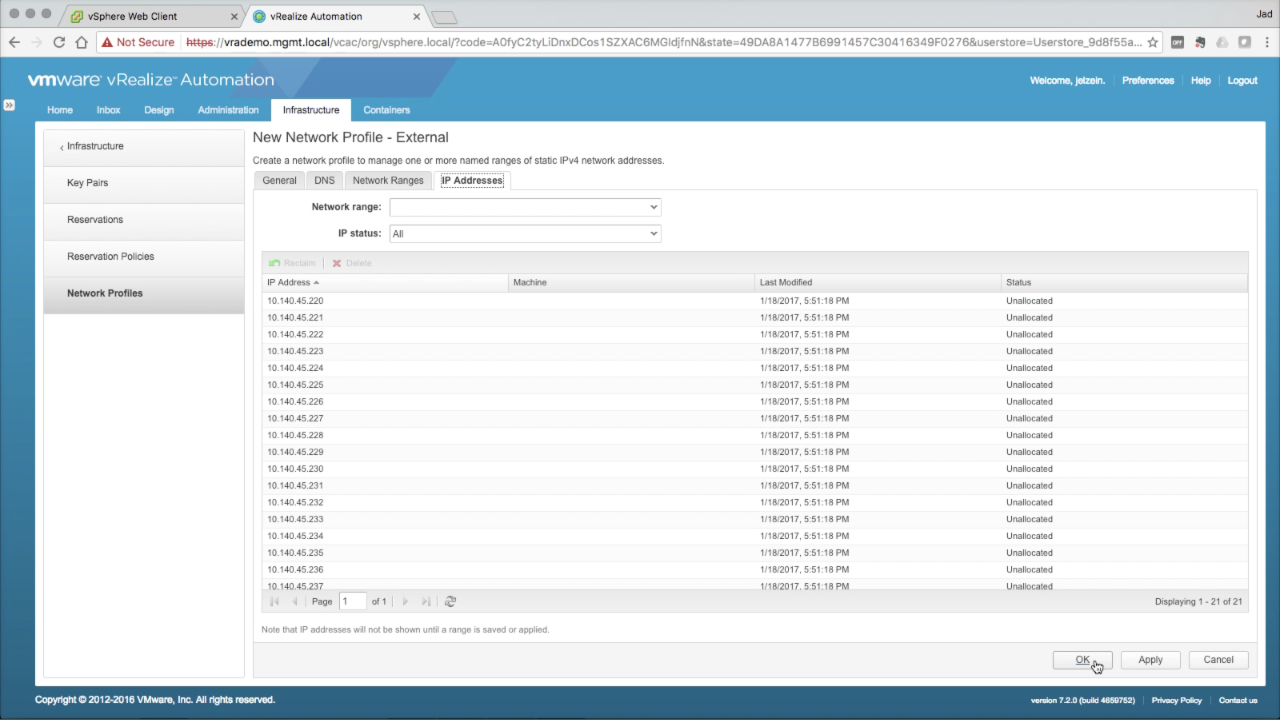
Network Profile → Network Ranges Network ranges defined an IP scope for addressing machines that use the network profile. vRA will assign and track IP allocations using this scope. In the Network Ranges tab, enter the required info to create a new range:
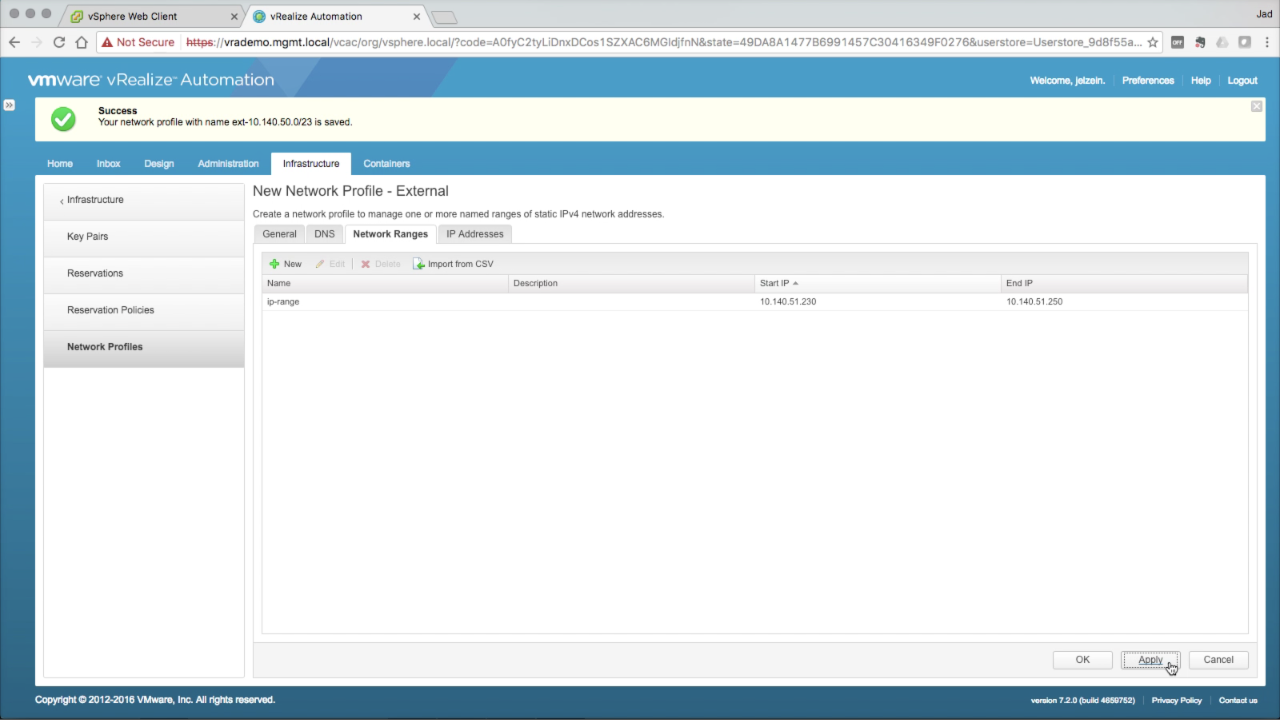
Click Apply to commit the network range (this is required to preview the IP list in the next step).
NOTE: Be sure this range is dedicated to vRA and does not conflict with any external services (e.g. DHCP). vRA will not check for external IP conflicts prior to assigning available IP addresses. IP Ranges can be modified at any time, however you cannot remove any IP address that has an active assignment. Click the IP Addresses tab… |
|
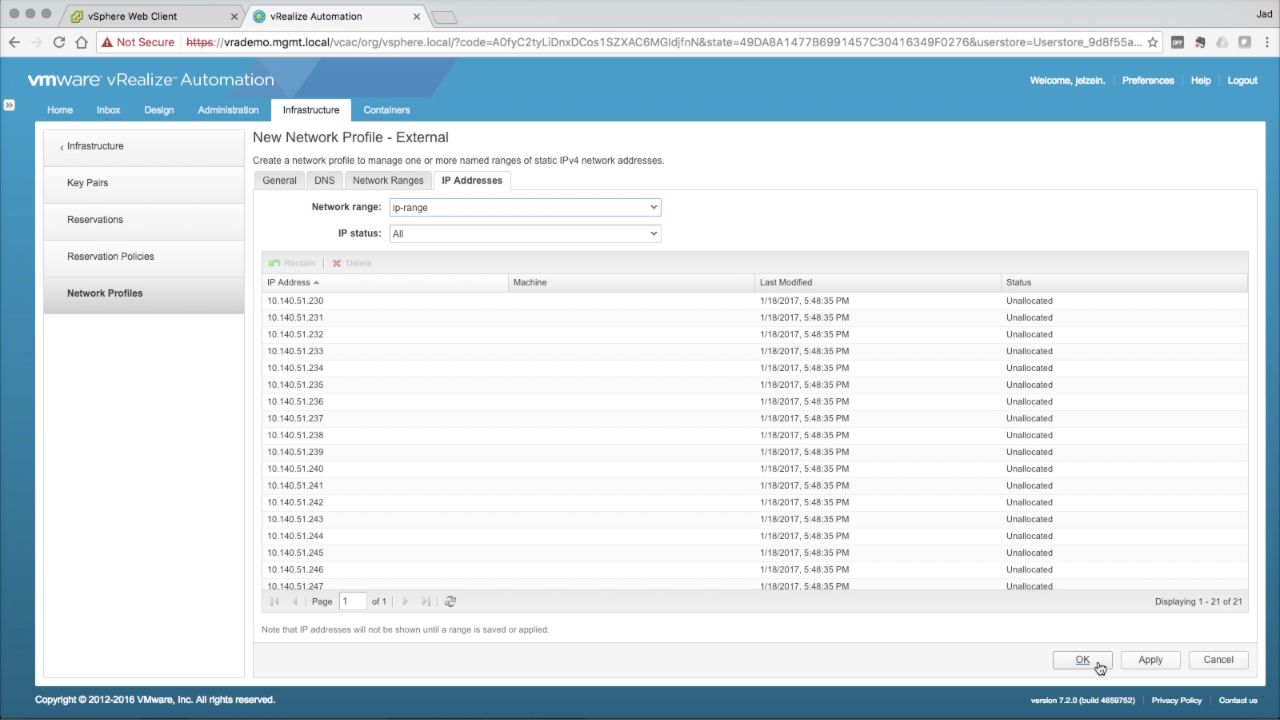
| Network Profile → IP Addresses
In the IP Address tab, you can review the IP Range assignments added in the previous step. This is an information tab…no configuration needed. Once machines using this network profile (and corresponding network path), vRA will record and track the IP assignment in this list. You can refer back to this tab to get visibility into the assignments. Click OK to save the new Network Profile. |
|
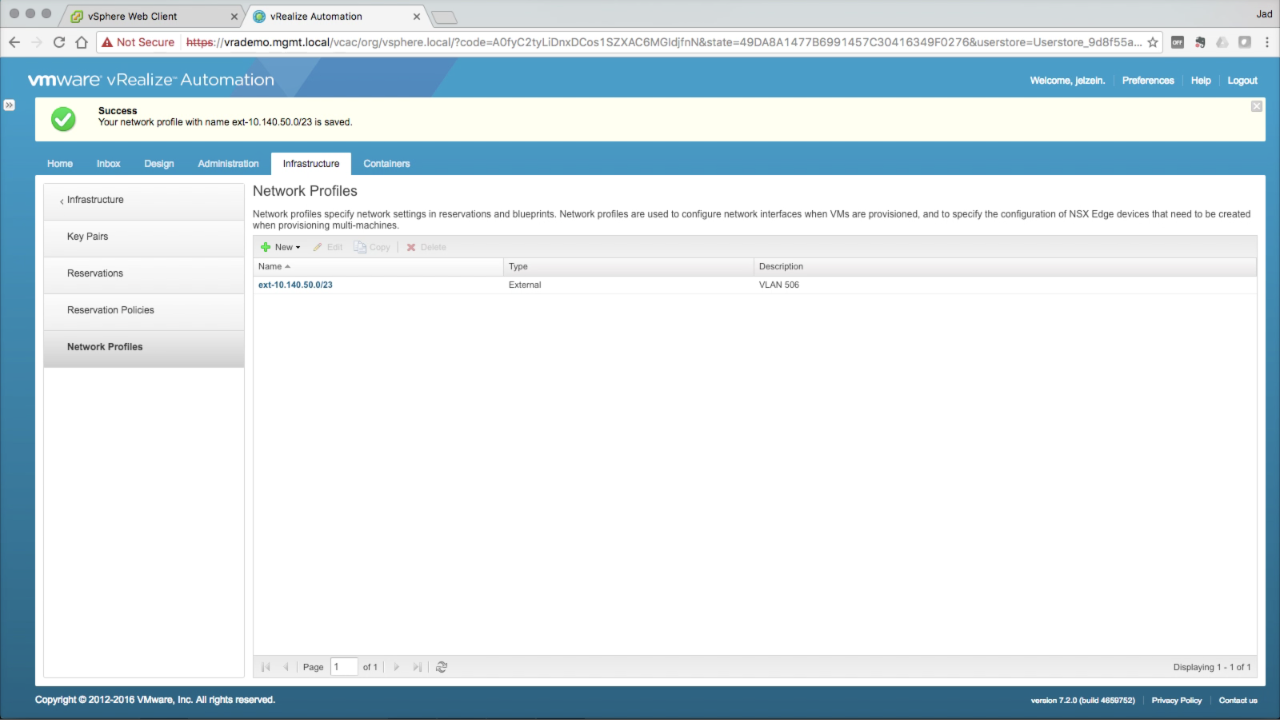
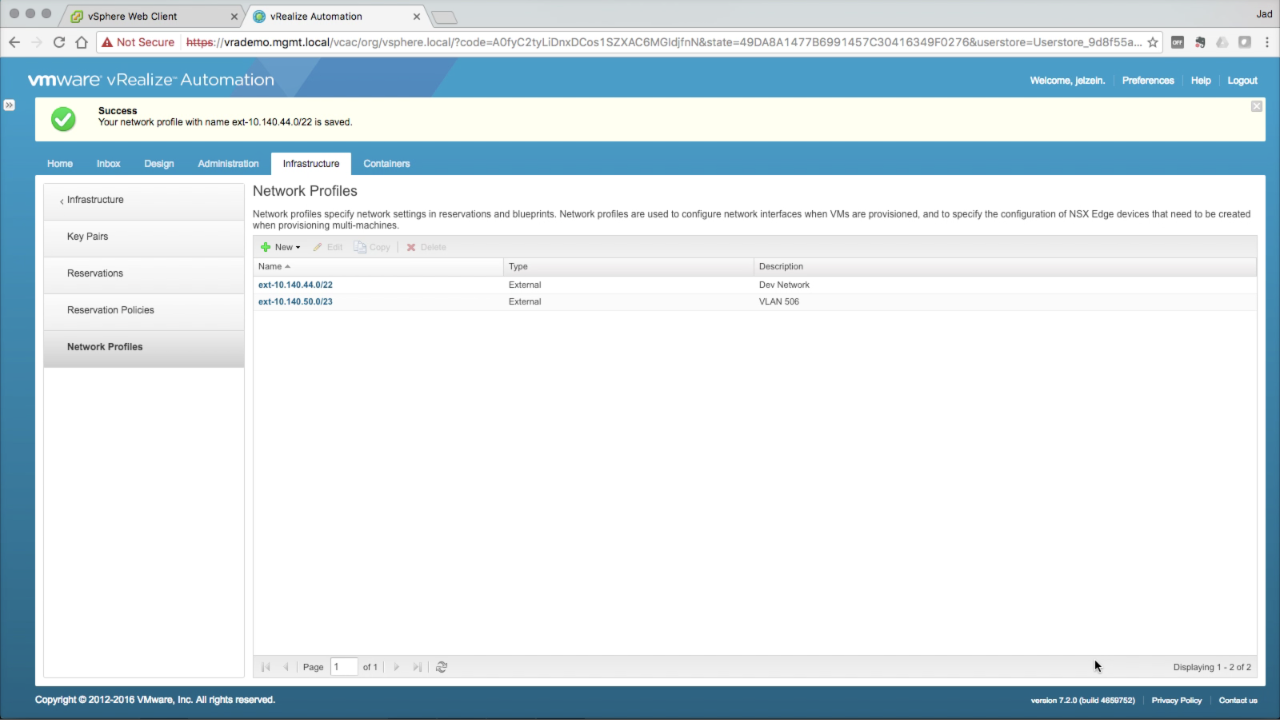
| Network Profiles
Once saved, the Network Profile will become available to assign to the Network Paths in Reservations. Once that assignment is done, Network Profiles can be dragged and dropped onto the Converged Blueprint Designer for use by machines on the canvas. Next, we’ll create another Network Profile for a second network used in this environment… |
|
| Network Profiles
Create another Network Profile for any other networks that will be used in the environment. In this case, i’ll be creating a profile that will be bound to the Developer’s network in a later step. Click + New → External to create an External network profile… |
|
| Network Profile → General
In the General tab, enter the required details:
Click on the DNS tab… |
|
| Network Profile → DNS
In the DNS tab, enter the optional DNS details:
Click on the Network Ranges tab to continue… |
|
| Network Profile → Network Ranges
In the Network Ranges tab, enter the required info to create a new range:
Click Apply to commit the network range (this is required to preview the IP list in the next step). Click the IP Addresses tab… |
|
| Network Profile → IP Addresses
In the IP Address tab, you can review the IP Range assignments added in the previous step. This is an information tab…no configuration needed. Once machines using this network profile (and corresponding network path), vRA will record and track the IP assignment in this list. You can refer back to this tab to get visibility into the assignments. Click OK to save the new Network Profile. |
|
| Network Profiles
Review your new Network Profiles and add any additional profiles required in your environment. You should have a Network Profile defined for each target network. At this point, they will all be External networks (logical network collected in vSphere endpoint inventory). We’ll get into Routed and NAT networks in the NSX modules later. Next, we’ll be configuring Reservations to allocate resources to Business Groups. We’ll use these Network Profiles for the configured Network Paths. |
|
| Reservations | |
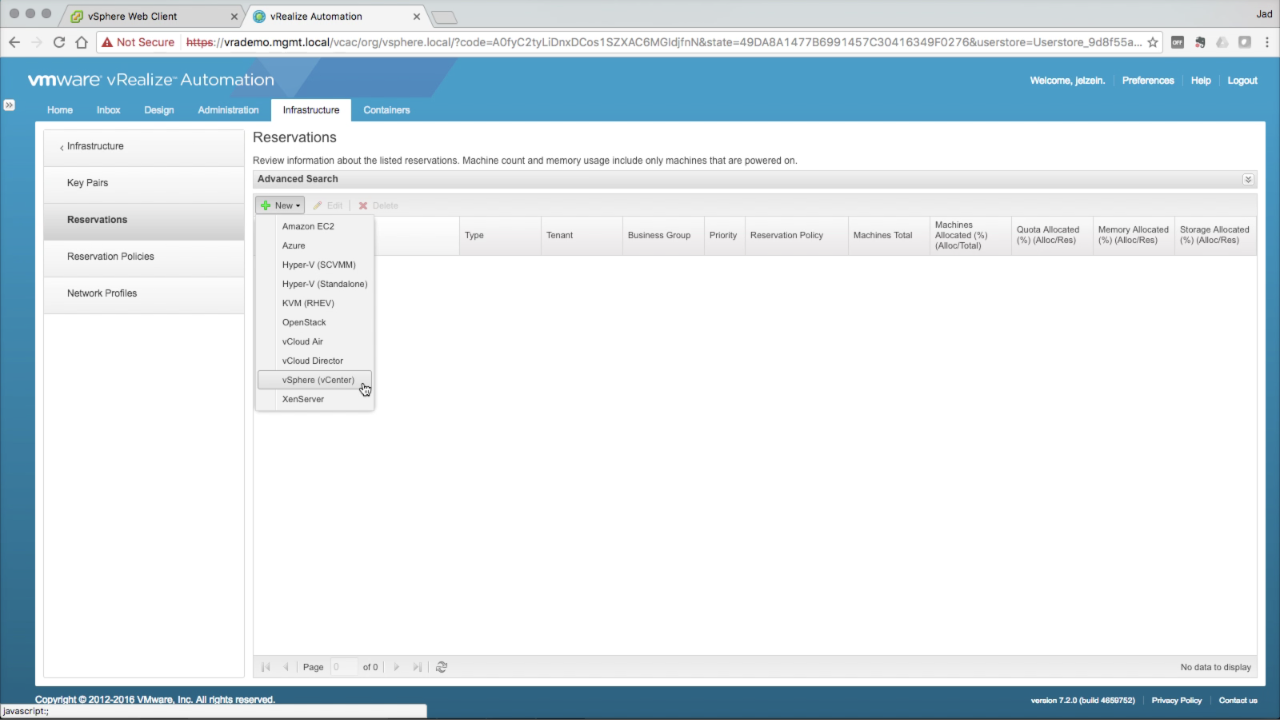
|
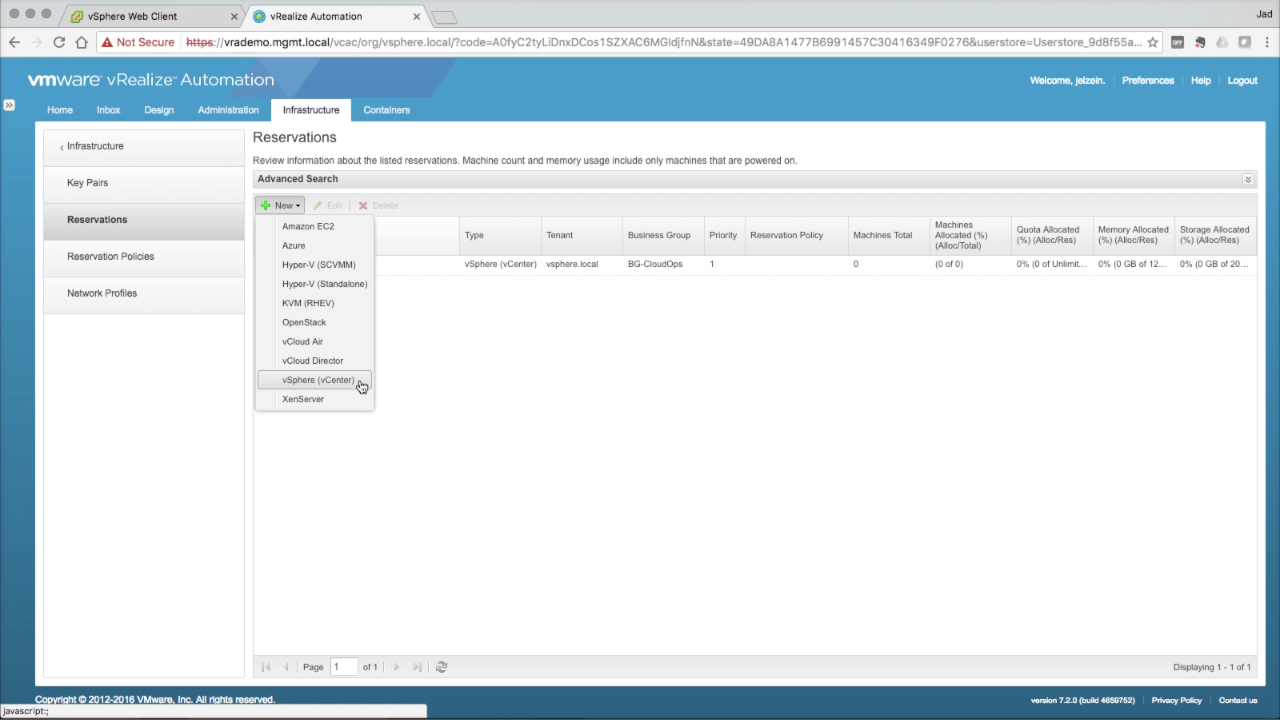
Reservations One or more reservations are created to allocate IaaS Fabric resources to Business Groups. Navigate to Infrastructure → Reservations Click on + New and select Sphere (vCenter) from the drop-down menu…
One or more Reservations are created per endpoint. A Reservation cannot include heterogeneous resources. |
|
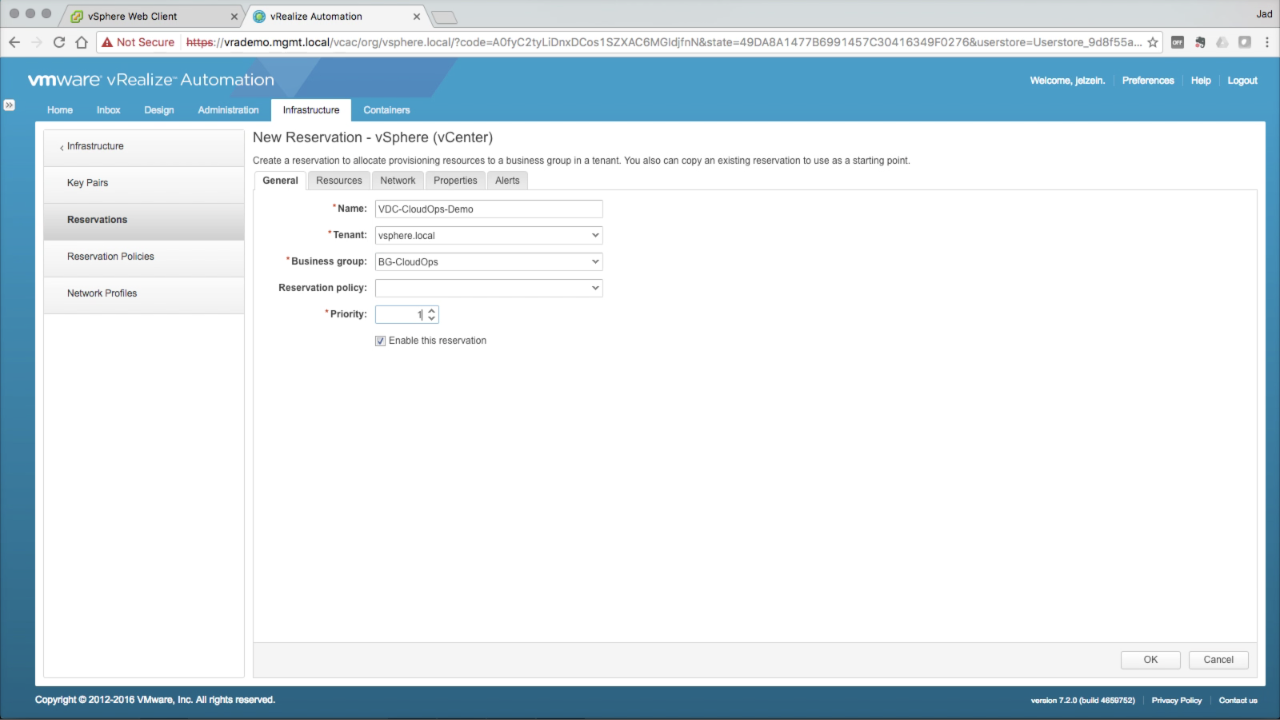
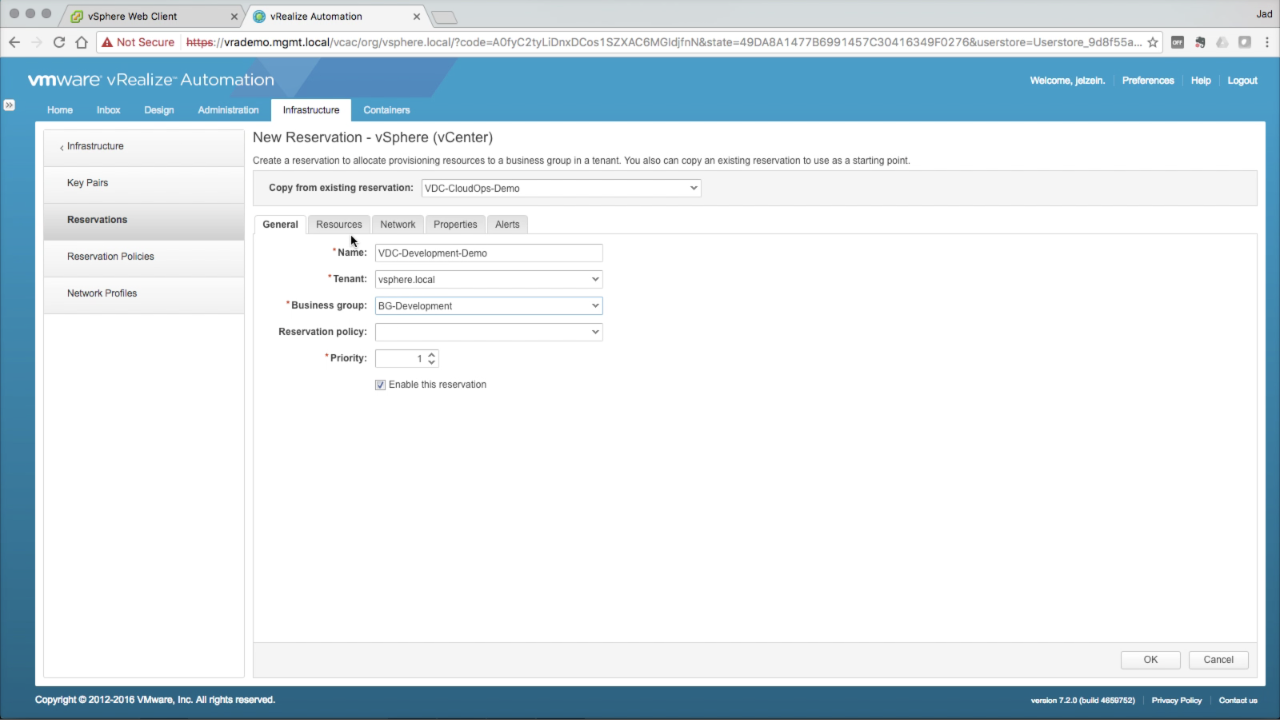
| Reservations
In the General tab, enter the required details:
Click the Resources tab… |
|
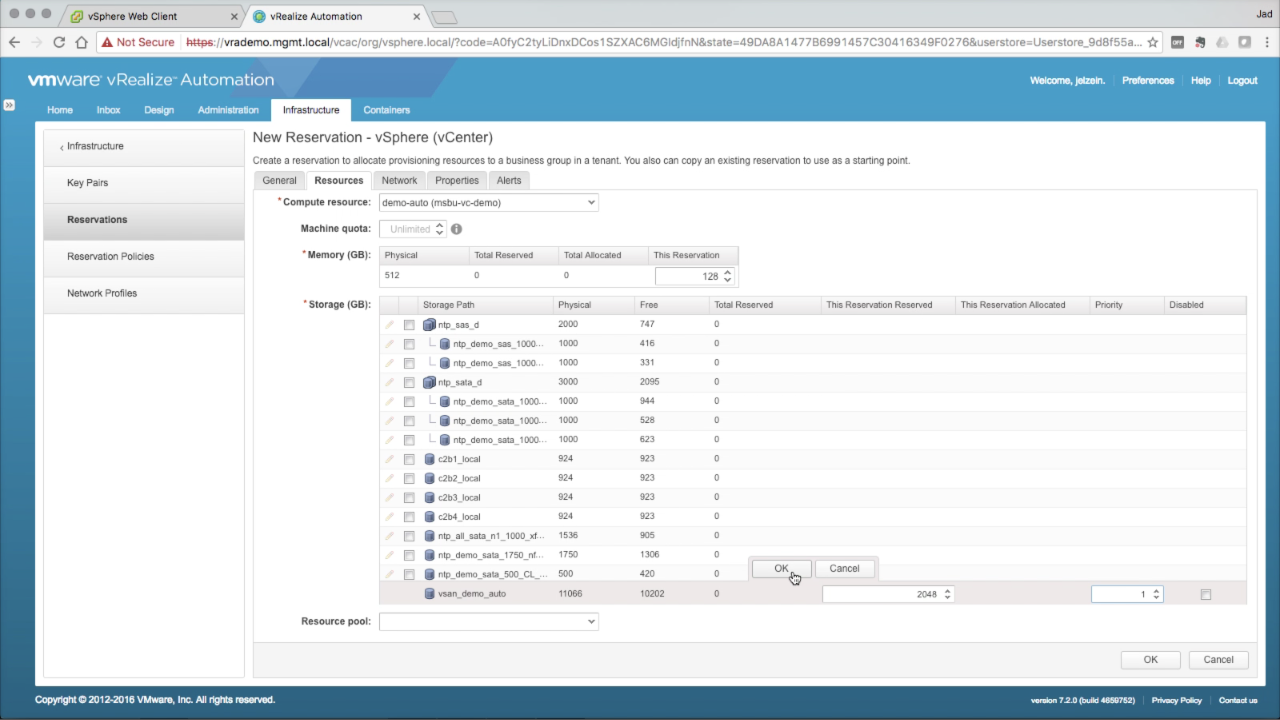
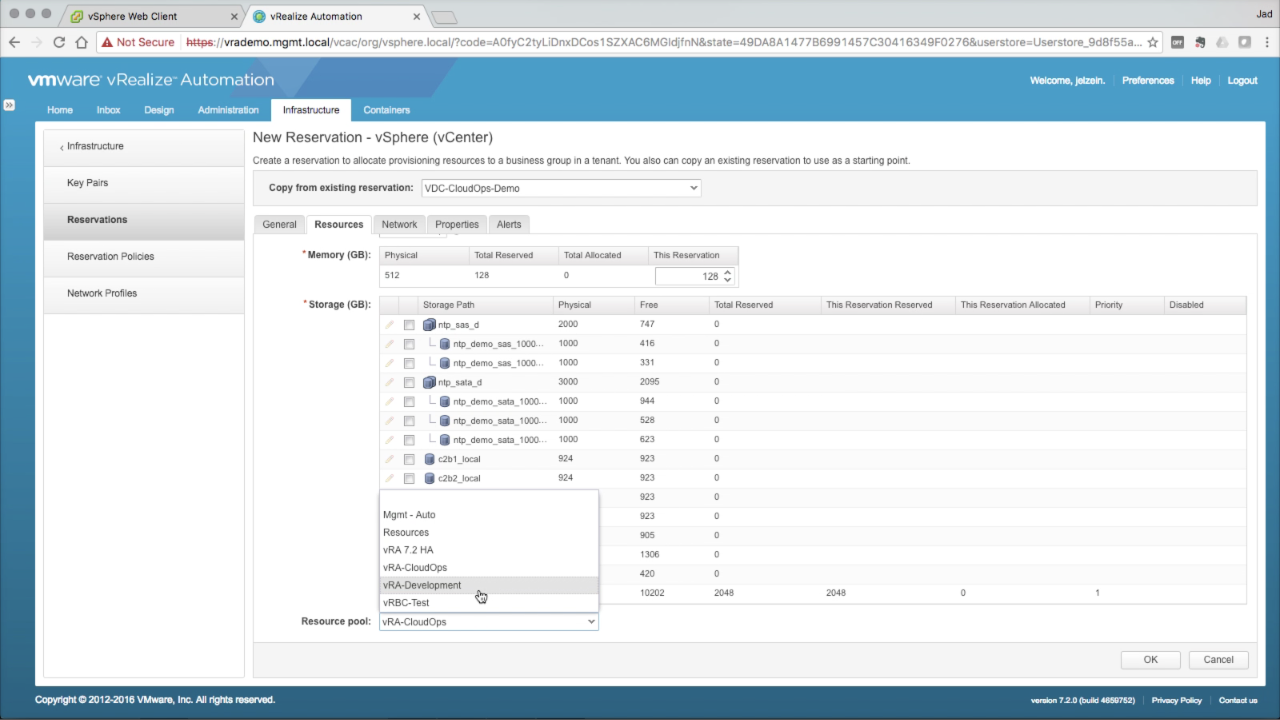
| Reservations → Resources
In the Resources tab, enter the required details…
|
|
|
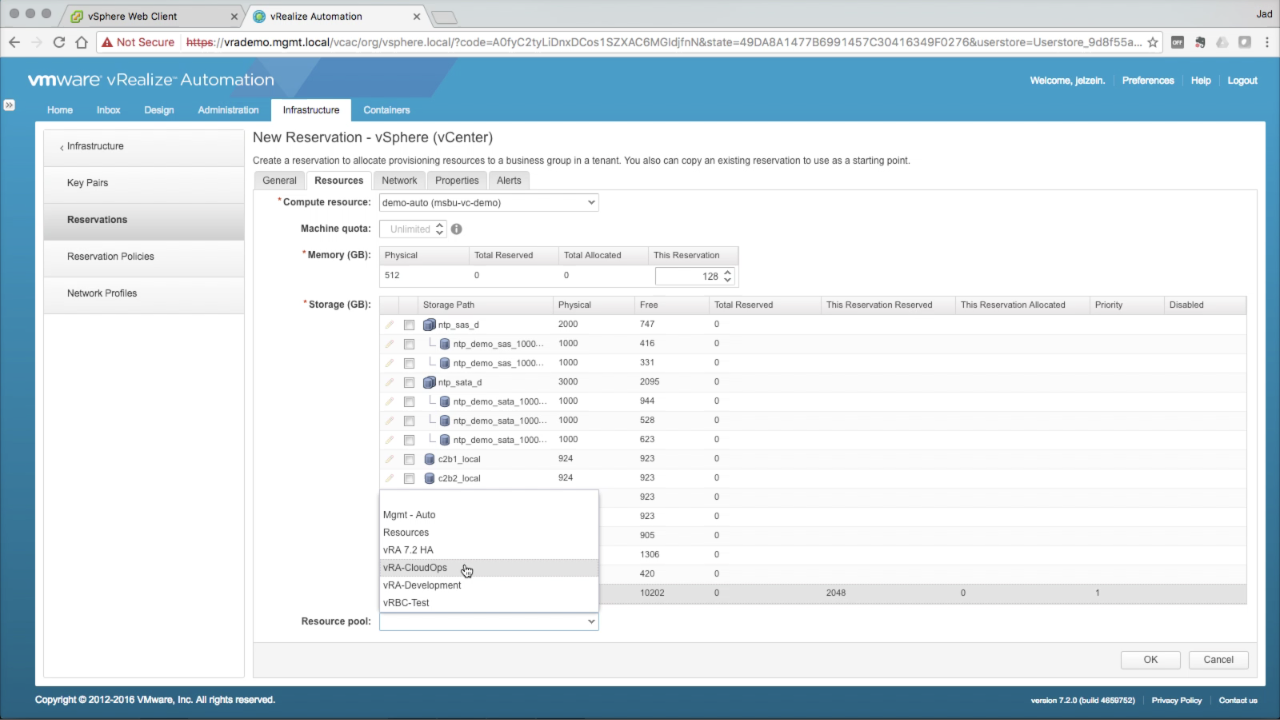
Reservations → Resources Optionally, you can select a discovered Resource Pool from the drop-down. This will result in placing all machines provisioned to this Reservation into the selected Resource Pool…
NOTE: As a general practice, i opt to create a Resource Pool per Business Group and for machine placement. This is a good option for organizational purposes, but not necessarily a best practice (considering the potential performance impact in cases of resource contention). |
|
|
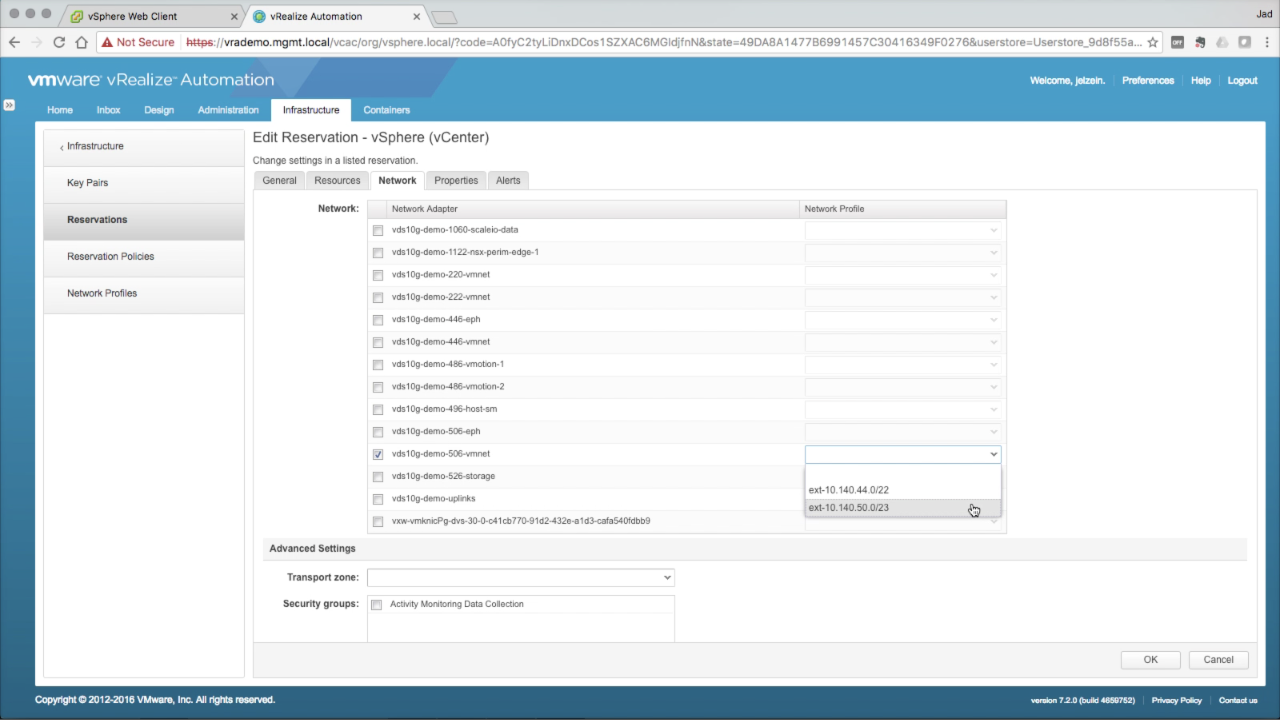
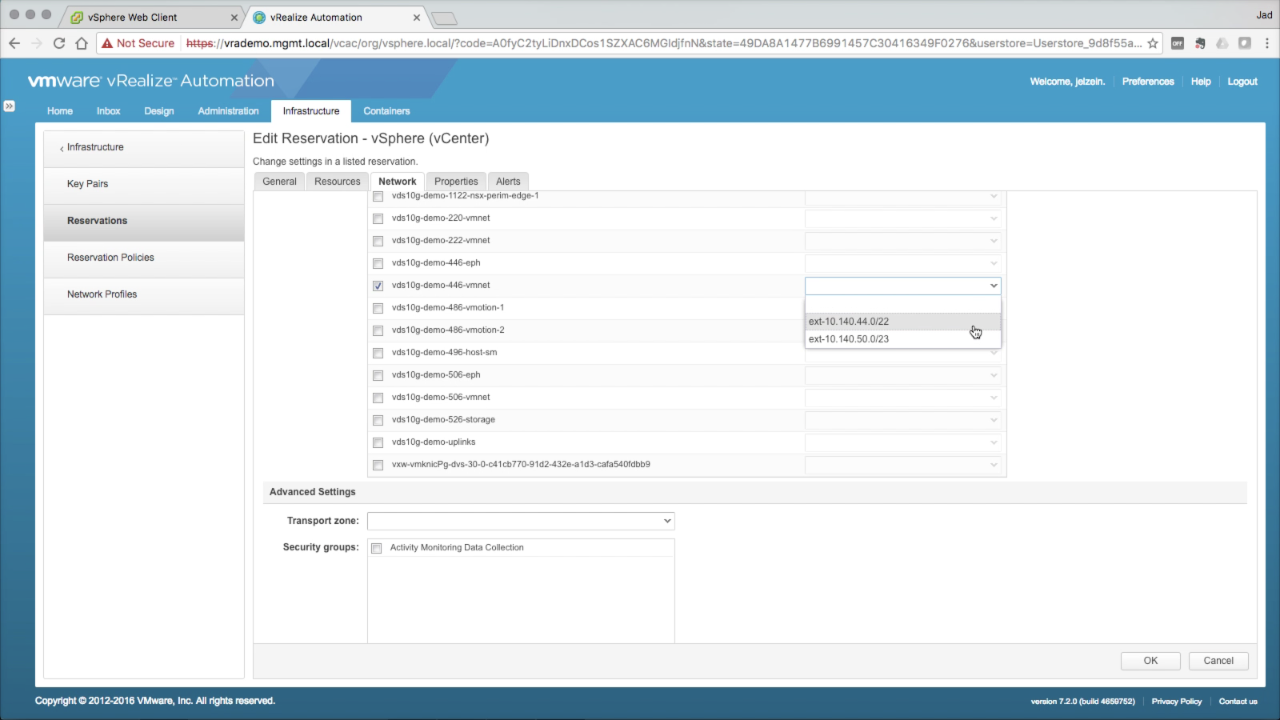
Reservations → Network Navigate to the Network tab The list of Networks represent all logical networks (port groups, distributed port groups) that were collected during endpoint inventory. Select the target Network Path from the list of available networks. Select the corresponding Network Profile from the drop-down.
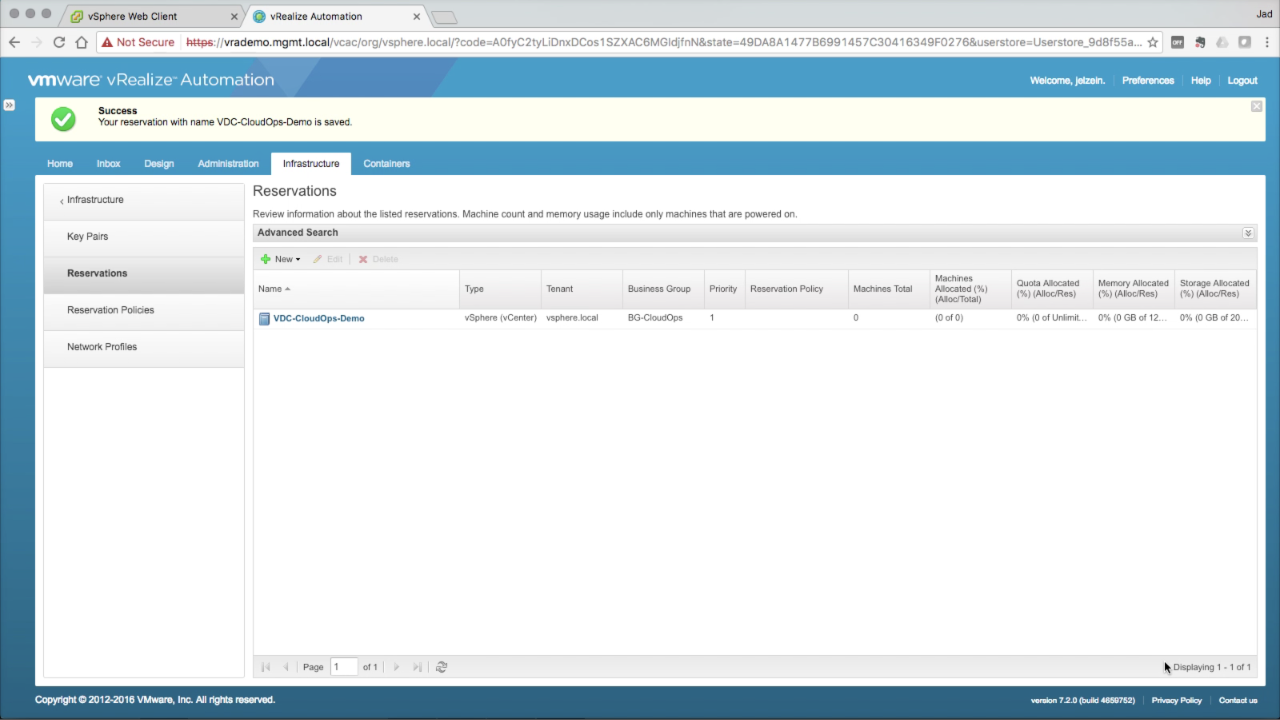
NOTE: The selected network path will be the default network for all machines provisioned to this Reservation. Selecting multiple paths would result in load balancing across the paths, which is typically not a desirable outcome. Multiple network paths can be selected when bound to a corresponding Networking Profile, which is a requirement prior to dragging networks to the converged blueprint designer. Keep Advanced Settings defaults for now. Click OK to add the new Reservation. |
|
| Reservations
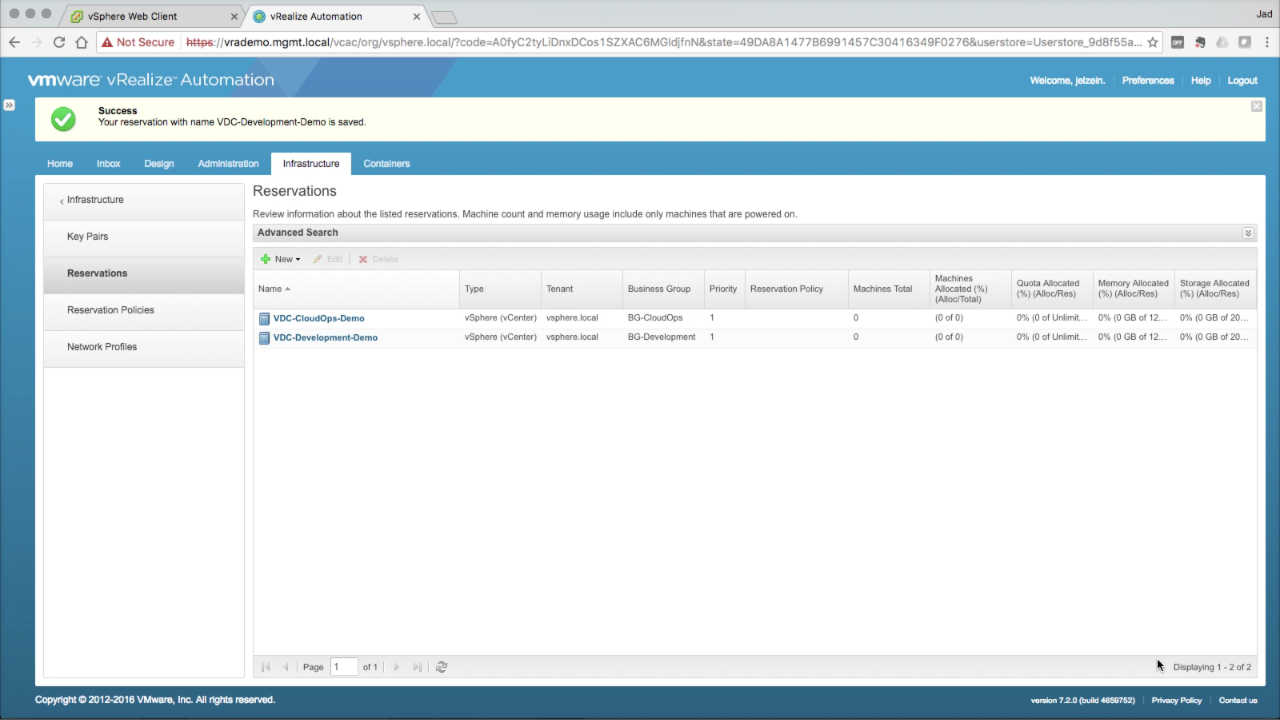
Since Reservations are bound to individual Business Groups (i.e. can’t share across BG’s), we’ll create another Reservation for the Development BG. Repeat the steps above to create another Reservation… Click on + New and select Sphere (vCenter) from the drop-down menu… |
|
| Reservations
In the General tab, enter the required details:
Click the Resources tab… |
|
| Reservations → Resources
In the Resources tab, enter the required details…
|
|
| Reservations → Network
Navigate to the Network tab Select the target Network Path from the list of available networks. Select the corresponding Network Profile from the drop-down. Keep Advanced Settings defaults for now. Click OK to add the Reservation. |
|
Review
This guide walked you through setting up an IaaS Fabric based primarily on vSphere resources. However, vRA supports several other hypervisor and cloud platforms that can be incorporated into a heterogeneous Fabric. While each platform may require some unique Endpoint configuration steps (based on platform use and functionality), general consumption is consistent across the board. The one exception is Microsoft Azure, which is built largely on vRA’s onboard extensibility platform vs. the traditional, .net engine.
Now that we have resources configured, it’s time to build some initial services.
-
Next Step: 09 – IaaS Blueprints
+++++
@virtualjad
![[virtualjad.com]](https://www.virtualjad.com/wp-content/uploads/2018/11/vj_logo_med_v3.png)
