vRA7.2 DIG – Microsoft Azure Integration

vRealize Automation 7.2 added native support for Microsoft Azure as a cloud Endpoint. This allows customers to quickly add their subscribed Azure resources to vRA for management and consumption. Azure is the latest addition to the list of native IaaS Endpoints, but the integration takes a different approach from the traditional IaaS Endpoints. For starters, Azure integration is built entirely on vRA’s native extensibility platform vs. the traditional [.net] engine. Likewise, the Azure endpoint is added to vRA as an extensibility endpoint, unlike most other native endpoints that are configured in the Infrastructure section.

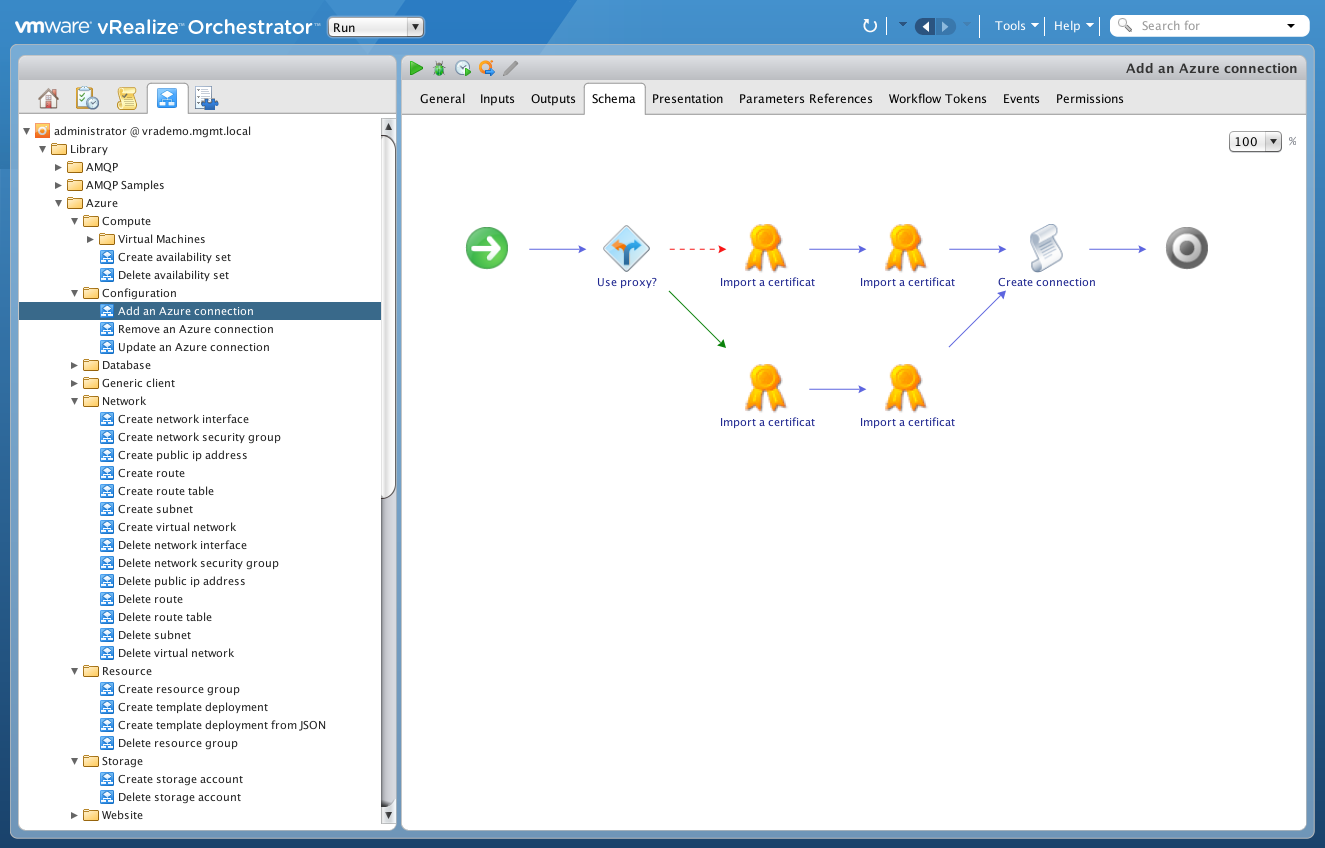
Behind the scenes, vRA heavily leverages vRealize Orchestrator (vRO) and a set of OOTB workflows to orchestrate various Azure functions. The included workflows are provided to deliver core Azure functionality and a handful of Day2 operations, but can also be copied and customized to provide additional functionality and XaaS services as needed. This can help fill any gaps in native functionality and, more importantly, deliver unique integrations that would otherwise be quite complex.

But don’t let any of this scare you. Building, provisioning, and managing Azure workloads is accomplished using all the familiar user interfaces in vRA. From a consumption perspective, vRO is tucked in the background and is invoked by vRA based on the task at hand.

vRA 7.2 Detailed Implementation VIDEO Guide

Welcome to the vRealize Automation 7.2 Detailed Implementation VIDEO Guide. This is a collection of all the videos making up the full vRealize Automation 7.2 Detailed Implementation Guide.

The guide (and these videos) was put together to help you deploy and configure a highly-available, production-worthy vRealize Automation 7.2 distributed environment, complete with SDDC integration (e.g. VSAN, NSX), extensibility examples and ecosystem integrations. The design assumes VMware NSX will provide the load balancing capabilities and includes details on deploying and configuring NSX from from scratch to deliver these capabilities.

Be sure to refer back to the full guide for detailed configuration steps or more info on any given topic.


01, Introduction

High-Level Overview

  • Production deployments of vRealize Automation (vRA) should be configured for high availability (HA)
  • The vRA Deployment Wizard supports Minimal (staging / POC) and Enterprise (distributed / HA) for production-ready deployments, per the Reference Architecture
  • Enterprise deployments require external load balancing services to support high availability and load distribution for several vRA services
  • VMware validates (and documents) distributed deployments with F5 and NSX load balancers
  • This document provides a sample configuration of a vRealize Automation 7.2 Distributed HA Deployment Architecture using VMware NSX for load balancing

Implementation Overview

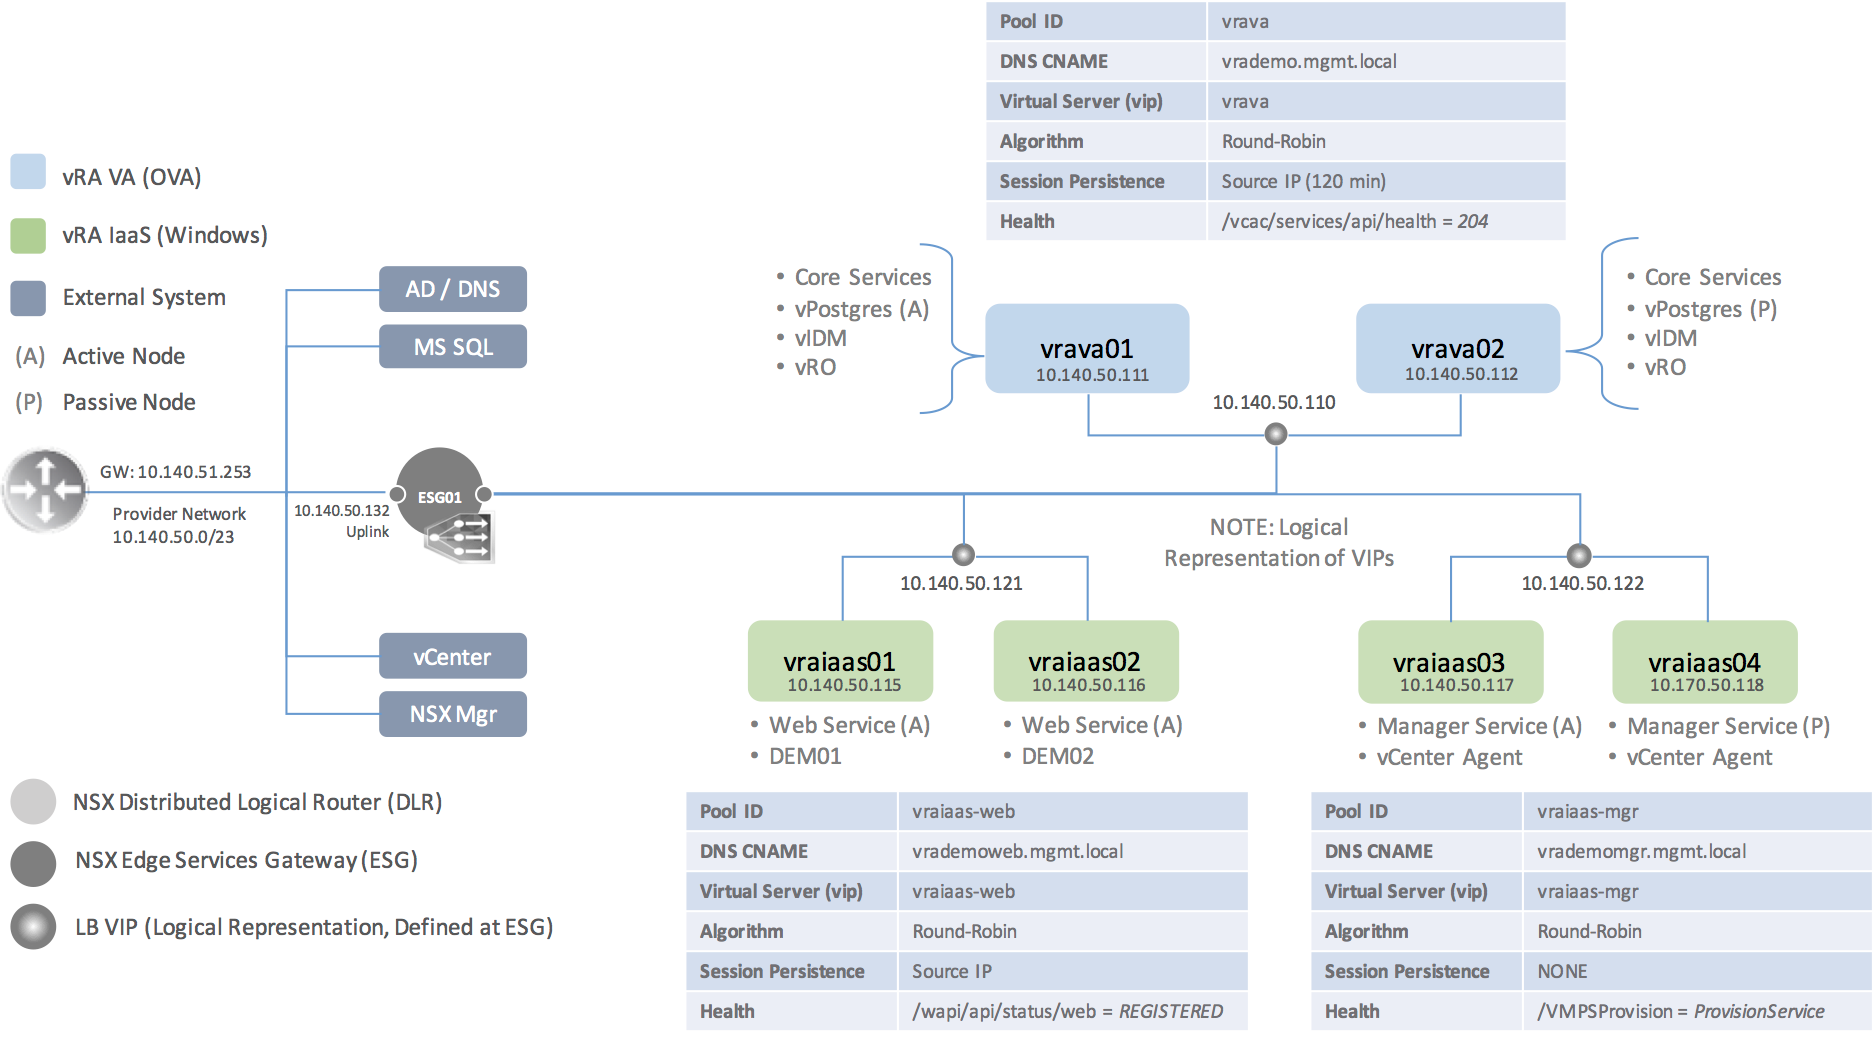
To set the stage, here’s a high-level view of the vRA nodes that will be deployed in this exercise.…

vRA 7.2 DIG – 06.1, NSX Load Balancer Config

Next we’ll be configuring load balancing and high availability policies for the distributed components. An NSX Edge Service Gateway (ESG) will be providing the load balancing and availability services to vRA as an infrastructure service. vRA supports In-Line and One-Arm load balancing policies. This implementation will be based on an In-Line configuration, where the vRA nodes and the load balancer VIPs are on the same subnet.

(If you do not plan on using NSX for HA services, you can skip this configuration)


The vRA Load Balancing Guide provides additional details and load balancing guidelines for NSX, F5, and NetScaler.

NSX Load Balancing configuration consists of creating a Application Profile, Health Monitoring policy, Server Pool(s), and a Virtual Server (VIP) per load-balanced pair. These services can be configured after the initial deployment (preferred) to avoid any potential deployment issues related to load balancing config.


Load Balancer Application Profile Config

Server Role Type SSL Pass-through Persistence Persistence Time-Out (sec)
vRealize Automation HTTPS Enabled Source IP 1800
vRealize Automation IaaS Web HTTPS Enabled Source IP 1800
vRealize Automation IaaS Manager HTTPS Enabled NONE N/A


Load Balancer Service Monitoring Config

Server Role Type Interval Timeout Retries Method URL Receive Expected
vRealize Automation HTTPS 3 10 3 GET /vcac/services/api/health 204
vRealize Automation IaaS Web HTTPS 3 10 3 GET /wapi/api/status/web REGISTERED
vRealize Automation IaaS Manager HTTPS 3 10 3 GET /VMPSProvision ProvisionService


Load Balancer Pool Config

Server Role Algorithm Monitors Members Port Monitor Port
vRealize Automation ROUND-ROBIN <vRealize Automation monitor> vRA VA Nodes 443 443
 vRA Remote Console ROUND-ROBIN <vRealize Automation monitor> vRA VA Nodes 8444 443
vRealize Automation IaaS Web ROUND-ROBIN <vRealize Automation IaaS Web monitor> IaaS Web Nodes 443 443
vRealize Automation IaaS Manager ROUND-ROBIN <vRealize Automation IaaS Manager monitor> IaaS Manager Nodes 443 443


Virtual Server (VIP) Config

Server Role Port Default Pool Application Profile
vRealize Automation Pool 443 <vRealize Automation Pool> <vRealize Automation Profile>
 vRA Remote Console 8444 <vRealize Automation Remote Console Pool> <vRealize Automation Profile>
vRealize Automation IaaS Web 443 <vRealize Automation IaaS Web Pool> <vRealize Automation IaaS Web Profile>
vRealize Automation IaaS Manager 443 <vRealize Automation IaaS Manager Pool> <vRealize Automation IaaS Manager Profile>


vRA 7.2 DIG – 07, Initial Tenant Configuration

vIDM is policy-driven and adds a significant amount capability over the IDVA. vRA 7 customers will gain many of the OOTB capabilities of the stand-alone vIDM product and be able to configure and manage these features directly with the vRA UI. For anyone who has used vIDM as a stand-alone solution or as part of another product (e.g. Horizon Workspace), configuring vIDM will be just as straight forward. But even if you’ve never configured it before, it is intuitive and walks you through the logical steps of setting up auth sources and advanced policies…

For Active Directory integration, vIDM Directories are configured to sync with one or more domains.

vRA 7.2 DIG – 05, Deployment Wizard

The Deployment Wizard is invoked by logging into the primary VA’s Virtual Appliance Management Interface (VAMI) using the configured root account. Once logged in, the admin is immediately presented with the new Deployment Wizard UI. The wizard will provide a choice of a minimal (POC, small) or enterprise (HA, distributed) deployment then, based on the desired deployment type, will walk you through a series of configuration details needed for the various working parts of vRA, including all the windows-based IaaS components and dependencies. For HA deployments, all the core components are automatically clustered and made highly-available based on these inputs.

In both Minimal and Enterprise deployments, the IaaS components (Manager Service, Web Service, DEMs, and Agents) are automatically pushed to available windows IaaS servers made available to the installer thanks to the management agent.

More Details: https://www.virtualjad.com/2015/10/vrealize-automation-7-part-3-the-deployment-wizard.html

Checklist:

  • Log in to VAMI of Primary Appliance (vrava01)
  • Initiate Installation Wizard when prompted
  • Follow the prompts to complete a distributed installation
  • Validate services are started

Video

vRA 7.2 DIG – 04, Prepare IaaS Hosts

vRA’s IaaS engine is a .net-based application that is installed on a number of dedicated Windows machines. In the old days, the IaaS components were manually installed, configured and registered with the vRA appliance(s). This included manual installation of many prerequisites. The effort was quite tedious and error-prone, especially in a large distributed environment.

In vRA 7.0 and higher, the installation and configuration of system prerequisites and IaaS components has been fully automated by the Deployment Wizard. But prior to kicking off the wizard, the vRA Management Agent needs to be installed on each IaaS host. Once installed, the host is registered with the primary virtual appliance and made available for IaaS installation during the deployment. While the Deployment Wizard will automatically push most of the prerequisites (after a prerequisite check), you have the option to install any or all of the prereqs ahead of time. However, the wizard’s success rate has improved greatly and is the preferred method for most environments.

Exception: Java (64-bit) is required on all the IaaS hosts and cannot be pushed by the deployment wizard. As a prerequisite to installing IaaS, you must install a supported 64-bit version of Java and add the “JAVA_HOME” system variable on each host.…

vRA 7.2 DIG – 03, Deploy vRA Virtual Appliances

The vRA virtual appliance (OVA) is downloaded from vmware.com and deployed to a vSphere environment. In a distributed deployment, you will deploy both primary and secondary nodes ahead of kicking off the deployment wizard.

The VA also includes the latest IaaS installers, including the required management agent (that will be covered in the next section).

Checklist:

  • Download and Deploy vRA OVA (x2) to vSphere
  • Configure VA properties
  • Confirm Time settings
  • Confirm accessibility post deployment
  • Confirm DNS Resolution

Video

vRA 7.2 DIG – 02, Deploy and Configure VMware NSX

We will be leveraging VMware NSX in this implementation to provide the load balancing services for the vRA deployment as well as integrating into vRA for application-centric network and security. Before any of this is possible, we must deploy NSX to the vSphere cluster, prepare the hosts, and configure logical network services. The guide assumes the use of NSX for these services, but this is NOT a requirement. A distributed installation of vRA can be accomplished with most load balancers. VMware certifies NSX, F5, and NetScaler.

(You can skip this section if you do not plan on using NSX in your environment)

Checklist:

  • Deploy (3) NSX Controller Nodes
  • Prep vSphere Hosts
  • Complete Logical Network Preparation
  • Configure VXLAN Network
  • Configure Transport Zone

Video